LoginControl Example In Asp.Net 2.0 3.5 4.0 To Create Login Page Using Membership Provider DataBase ASPNETDB.MDF.
Create a new website and add new web form in the solution, name it Login.aspx,
Drag and place a Login control on this page from toolbox in visual studio.
Assign DestinationPageUrl property of Login control to the page we want to open after login, i m redirecting to Default.aspx page.
Place a LoginStatus and LoginName control on Default.aspx page to display username and logout hyperlink.
Now we need to configure our website or application to use membership provider database to authenticate user login credentials.
For this Click on website menu of visual studio and select ASP.NET Configuration.
Click on Security Tab and click on Use the security Setup Wizard to configure security step by step link.
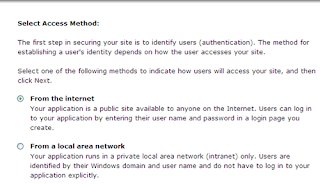
Click next on welcome screen And Select From the internet option in next screen.
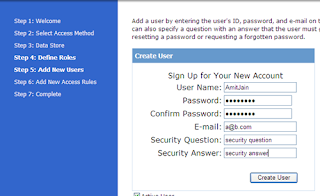
Click next and reach to step 5 to create new user, enter username and password and other informations and click on create user.
In next screen Select Anonymous User radion button and then select deny permission, click on add this rule to dent anonymous access to site.
CLick on finish to complete asp.net membership provider configuration.
This will autometically add ASPNETDB.MDF database in App_Data Folder.
Build and run the application, login with the credentials used in creating new user in configuration.
Create a new website and add new web form in the solution, name it Login.aspx,
Drag and place a Login control on this page from toolbox in visual studio.
Assign DestinationPageUrl property of Login control to the page we want to open after login, i m redirecting to Default.aspx page.
HTML SOURCE OF LOGIN.ASPX PAGE
<form id="form1" runat="server">
<asp:Login ID="Login1" runat="server"
onloginerror="Login1_LoginError"
RememberMeSet="True"
DestinationPageUrl="~/Default.aspx">
</asp:Login>
</form>
Place a LoginStatus and LoginName control on Default.aspx page to display username and logout hyperlink.
HTML SOURCE OF DEFAULT.ASPX PAGE
<form id="form1" runat="server">
<div>
<asp:LoginStatus ID="LoginStatus1" runat="server" />
Welcome
<asp:LoginName ID="LoginName1" runat="server" />
</div>
</form>
Now we need to configure our website or application to use membership provider database to authenticate user login credentials.
For this Click on website menu of visual studio and select ASP.NET Configuration.
Click on Security Tab and click on Use the security Setup Wizard to configure security step by step link.
Click next on welcome screen And Select From the internet option in next screen.
Click next and reach to step 5 to create new user, enter username and password and other informations and click on create user.
In next screen Select Anonymous User radion button and then select deny permission, click on add this rule to dent anonymous access to site.
CLick on finish to complete asp.net membership provider configuration.
This will autometically add ASPNETDB.MDF database in App_Data Folder.
Build and run the application, login with the credentials used in creating new user in configuration.
If you like this post than join us or share


1 comments:
Very nice information you have shared......... i like this.....
Post a Comment