Showing posts with label AJAX. Show all posts
0

AjaxFileUpload AsyncFileUpload In ModalPopUp Extender Asp.Net

This example shows how to use AjaxFileUpload Control Or AsyncFileUpload In ModalPopUp Extender Using C# VB Asp.Net.

Place ToolkitScriptManager and a button inside UpdatePanel on the page, we will open ModalPopup in click event of this button to upload files.

Create one panel on the page and add AjaxFileUpload or Ajax AsyncFileUpload in it.

Async Ajax FileUpload In ModalPopUp Extender


HTML Source
<asp:ToolkitScriptManager ID="ToolkitScriptManager1" runat="server"/>
<asp:UpdatePanel ID="UpdatePanel1" runat="server">
<ContentTemplate>
<asp:Button ID="btnUpload" runat="server" 
            Text="Upload File" onclick="btnUpload_Click"/>
            
<asp:ModalPopupExtender runat="server" 
                        ID="modelPopupExtender1" 
                        TargetControlID="btnUpload"
                        PopupControlID="popUpPanel" 
                        OkControlID="btOK" 
                        BackgroundCssClass="modalBackground">
</asp:ModalPopupExtender>
 
 <asp:Panel ID="popUpPanel" runat="server" CssClass="pnl">
 <div style="font-weight: bold; border: Solid 3px Aqua; 
                                background-color: AliceBlue">
 
 <asp:AjaxFileUpload ID="AjaxFileUpload1" runat="server" 
                     OnUploadComplete="UploadComplete" 
                     OnClientUploadComplete="Success" 
                     ThrobberID="loader" Width="400px"/>
 <asp:Image ID="loader" runat="server" 
            ImageUrl ="~/loading.gif" 
            Style="display:None"/>
 </div><br /><br />
 <asp:Label ID="lblMessage" runat="server"/><br /><br />
 <asp:Button ID="btOK" runat="server" Text="OK" />
 <asp:LinkButton ID="LinkButton1" runat="server" CssClass="close" 
 OnClientClick="$find('modelPopupExtender1').hide(); return false;"/>
</asp:Panel>
</ContentTemplate>
</asp:UpdatePanel>


If you are using AsyncFileUpload Control then don't forget to set UploaderStyle property to Traditional, other wise it will throw invalid argument error.

<ajax:AsyncFileUpload ID="AsyncFileUpload1" runat="server" 
                      UploadingBackColor="Blue" 
                      CompleteBackColor="WhiteSmoke"
                      OnUploadedComplete="SaveUploadedFile" 
                      OnClientUploadComplete="Success" 
                      OnClientUploadError="Error"
                      UploaderStyle="Traditional"/>


Add following Javascript and CSS in head section of page.


Write following code in OnUploadComplete event to save file on server.

protected void UploadComplete(object sender, AjaxControlToolkit.AjaxFileUploadEventArgs e)
    {
        string path = Server.MapPath("~/Uploads/") + e.FileName;
        AjaxFileUpload1.SaveAs(path);
    }


Build and run the code.

Download Sample Code


4

Ajax AutoCompleteExtender In Master Page Asp.Net

This Example shows How To Use Ajax AutoCompleteExtender TextBox In Master Page In Asp.Net.

Open Visual Studio and create new website, add master page in it and design it as you want.

Create a BIN folder in application and add AjaxControlToolkit.dll in it.

I have use Northwind database to fetch names for AutoCompletion list.

Add Connection String in web.config file

<connectionStrings>
<add name="NorthwindConnectionString" 
     connectionString="Data Source=AMITJAIN\SQL;
                       Initial Catalog=Northwind;
                       User ID=amit;Password=password"
providerName="System.Data.SqlClient"/>
</connectionStrings>


Place ToolkitScriptManager on Master Page inside form tag, one textbox and Add Ajax AutoComplete Extender from Toolbox.

HTML SOURCE OF MASTER PAGE
<%@ Master Language="C#" AutoEventWireup="true" CodeFile="MasterPage.master.cs" Inherits="MasterPage" %>
<%@ Register Assembly="AjaxControlToolkit" Namespace="AjaxControlToolkit" TagPrefix="asp" %>
<!DOCTYPE html PUBLIC "-//W3C//DTD XHTML 1.0 Transitional//EN" "http://www.w3.org/TR/xhtml1/DTD/xhtml1-transitional.dtd">
 
<html xmlns="http://www.w3.org/1999/xhtml">
<head runat="server">
<title></title>
<asp:ContentPlaceHolder id="head" runat="server">
</asp:ContentPlaceHolder>
</head>
<body>
<form id="form1" runat="server">
<asp:ToolkitScriptManager ID="ToolkitScriptManager1" runat="server"/>
 
<asp:TextBox ID="txtAutoComplete" runat="server"/>
                               
<asp:AutoCompleteExtender ID="AutoCompleteExtender1" 
                          runat="server" 
                          DelimiterCharacters="" 
                          Enabled="True" 
                          ServicePath="~/AutoComplete.asmx" 
                          ServiceMethod="GetCompletionList"
                          TargetControlID="txtAutoComplete"
                          MinimumPrefixLength="1" 
                          CompletionInterval="10" 
                          EnableCaching="true"
                          CompletionSetCount="12">
</asp:AutoCompleteExtender>
                
<asp:ContentPlaceHolder id="ContentPlaceHolder1" runat="server">
</asp:ContentPlaceHolder>
 
</form>
</body>
</html>


We can set CompletionList WIdth and styles using CSS or use AutoCompleteExtender In GridView or Windows Forms Application.

Add new webservice, name it AutoComplete.asmx and write following code in it's code behind.

C#
using System.Collections.Generic;
using System.Web.Services;
using System.Data.SqlClient;
using System.Data;
using System.Configuration;

[WebService(Namespace = "http://tempuri.org/")]
[WebServiceBinding(ConformsTo = WsiProfiles.BasicProfile1_1)]
[System.Web.Script.Services.ScriptService]
public class AutoComplete : System.Web.Services.WebService {

    public AutoComplete () 
    {
    }

    [WebMethod]
    public string[] GetCompletionList(string prefixText, int count)
    {
        if (count == 0)
        {
            count = 10;
        }
        DataTable dt = GetRecords(prefixText);
        List items = new List(count);

        for (int i = 0; i < dt.Rows.Count; i++)
        {
            string strName = dt.Rows[i][0].ToString();
            items.Add(strName);
        }
        return items.ToArray();
    }

    public DataTable GetRecords(string strName)
    {
        string strConn = ConfigurationManager.ConnectionStrings["NorthwindConnectionString"].ConnectionString;
        SqlConnection con = new SqlConnection(strConn);
        SqlCommand cmd = new SqlCommand();
        cmd.Connection = con;
        cmd.CommandType = System.Data.CommandType.Text;
        cmd.Parameters.AddWithValue("@Name", strName);
        cmd.CommandText = "Select FirstName from Employees where FirstName like '%'+@Name+'%'";
        DataSet objDs = new DataSet();
        SqlDataAdapter dAdapter = new SqlDataAdapter();
        dAdapter.SelectCommand = cmd;
        con.Open();
        dAdapter.Fill(objDs);
        con.Close();
        return objDs.Tables[0];
    }
}

VB.NET
Imports System.Collections.Generic
Imports System.Web.Services
Imports System.Data.SqlClient
Imports System.Data
Imports System.Configuration

 _
 _
 _
Public Class AutoComplete
 Inherits System.Web.Services.WebService

 Public Sub New()
 End Sub

  _
 Public Function GetCompletionList(prefixText As String, count As Integer) As String()
  If count = 0 Then
   count = 10
  End If
  Dim dt As DataTable = GetRecords(prefixText)
  Dim items As New List(Of String)(count)

  For i As Integer = 0 To dt.Rows.Count - 1
   Dim strName As String = dt.Rows(i)(0).ToString()
   items.Add(strName)
  Next
  Return items.ToArray()
 End Function

 Public Function GetRecords(strName As String) As DataTable
  Dim strConn As String = ConfigurationManager.ConnectionStrings("NorthwindConnectionString").ConnectionString
  Dim con As New SqlConnection(strConn)
  Dim cmd As New SqlCommand()
  cmd.Connection = con
  cmd.CommandType = System.Data.CommandType.Text
  cmd.Parameters.AddWithValue("@Name", strName)
  cmd.CommandText = "Select FirstName from Employees where FirstName like '%'+@Name+'%'"
  Dim objDs As New DataSet()
  Dim dAdapter As New SqlDataAdapter()
  dAdapter.SelectCommand = cmd
  con.Open()
  dAdapter.Fill(objDs)
  con.Close()
  Return objDs.Tables(0)
 End Function
End Class


Build and run the application.

7

Asp.Net AjaxFileUpload Control With Drag Drop And Progress Bar

This Example explains how to use AjaxFileUpload Control With Drag Drop And Progress Bar Functionality In Asp.Net 2.0 3.5 4.0 C# And VB.NET.

May 2012 release of AjaxControlToolkit includes a new AjaxFileUpload Control which supports Multiple File Upload, Progress Bar and Drag And Drop functionality.

These new features are supported by Google Chrome version 16+, Firefox 8+ , Safari 5+ and Internet explorer 10 + , IE9 or earlier does not support this feature.

AjaxFileUpload Control Example with Drag Drop And Progress Bar

To start with it, download and put latest AjaxControlToolkit.dll in Bin folder of application, Place ToolkitScriptManager and AjaxFileUpload on the page.

HTML SOURCE
<asp:ToolkitScriptManager ID="ToolkitScriptManager1" runat="server"/>
          
<asp:AjaxFileUpload ID="AjaxFileUpload1" runat="server" 
                    OnUploadComplete="UploadComplete" 
                    ThrobberID="loader"/>
 
<asp:Image ID="loader" runat="server" 
           ImageUrl ="~/loading.gif" Style="display:None"/>


ThrobberID is used to display loading image instead of progress bar in unsupported browsers.

Type of files uploaded can be restricted by using AllowedFileTypes property with comma separated list such as "zip,doc,pdf".

Write following code in OnUploadComplete event to save the file.

C#
protected void UploadComplete(object sender, AjaxControlToolkit.AjaxFileUploadEventArgs e)
    {
        string path = Server.MapPath("~/Uploads/") + e.FileName;
        AjaxFileUpload1.SaveAs(path);
    }
VB.NET
protected void UploadComplete(object sender, AjaxControlToolkit.AjaxFileUploadEventArgs e)
    {
        string path = Server.MapPath("~/Uploads/") + e.FileName;
        AjaxFileUpload1.SaveAs(path);
    }
Build and run the code.

Download Sample Code


0

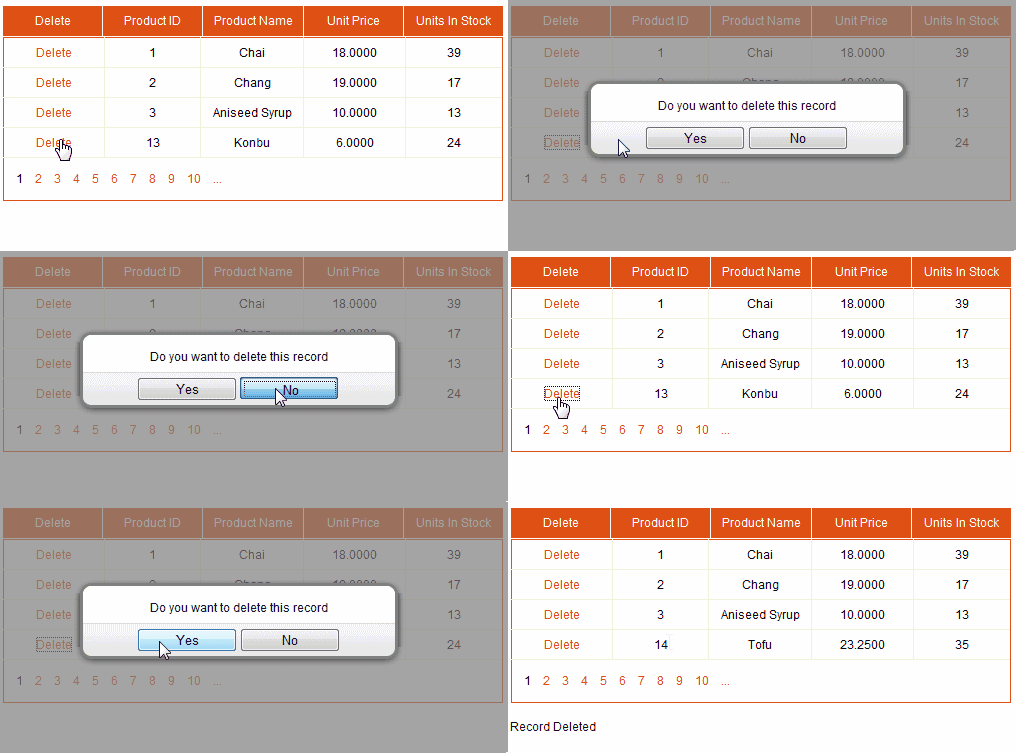
Ajax ConfirmButtonExtender With ModalPopUp In GridView Asp.Net

This example implements Ajax ConfirmButtonExtender With ModalPopUp Extender In Asp.Net GridView to show Delete Confirmation before deleting records.

Populate GridView using SqlDataSource and add one LinkButton inside TemplateField in Columns.

   1:  <asp:TemplateField HeaderText="Delete">
   2:  <ItemTemplate>
   3:  <asp:LinkButton ID="lnkDel" runat="server" 
   4:                  CommandName="Delete" Text="Delete"/>


Place ToolkitScriptManager and UpdatePanel on the page and add ConfirmButton, ModalPopUpExtender and Panel to pop inside Template field we added earlier.

HTML SOURCE
<div>
<asp:ToolkitScriptManager ID="ToolkitScriptManager1" runat="server"/>
<asp:UpdatePanel ID="UpdatePanel1" runat="server">
<ContentTemplate>
        
<asp:GridView ID="GridView1" runat="server" 
              AutoGenerateColumns="False" 
              DataKeyNames="ProductID" 
              DataSourceID="SqlDataSource1"
              onrowdeleted="GridView1_RowDeleted">
<Columns>
<asp:TemplateField HeaderText="Delete">
<ItemTemplate>
<asp:LinkButton ID="lnkDel" runat="server" 
                CommandName="Delete" Text="Delete"/>
                
<asp:ConfirmButtonExtender ID="ConfirmButtonExtender1" 
                           runat="server" 
                           TargetControlID="lnkDel"
                           DisplayModalPopupID="ModalPopupExtender1"/>
                                        
<asp:ModalPopupExtender ID="ModalPopupExtender1" 
                        runat="server"
                        TargetControlID="lnkDel"
                        PopupControlID="pnlModal"
                        BackgroundCssClass="Background"
                        OkControlID="btnYes"
                        CancelControlID="btnNo"
                        X="80"
                        Y="80"/>
 
<asp:Panel runat="Server" ID="pnlModal" CssClass="Pnl">
<br />         
Do you want to delete this record
<br /><br />
<asp:Button ID="btnYes" runat="server" Text="Yes"/>
<asp:Button ID="btnNo" runat="server" Text="No"/>
</asp:Panel>
</ItemTemplate>
</asp:TemplateField>
 
<asp:BoundField DataField="ProductID" HeaderText="ProductID"/>
<asp:BoundField DataField="ProductName" HeaderText="ProductName"/> 
<asp:BoundField DataField="UnitPrice" HeaderText="UnitPrice"/> 
<asp:BoundField DataField="UnitsInStock" HeaderText="UnitsInStock"/> 
</Columns>
</asp:GridView>
 
<asp:Label ID="lblMessage" runat="server" Text=""/>
</ContentTemplate>
</asp:UpdatePanel>
 
<asp:SqlDataSource ID="SqlDataSource1" runat="server" 
ConnectionString="<%$ ConnectionStrings:NorthwindConnectionString %>" 
DeleteCommand="DELETE FROM [Products] 
               WHERE [ProductID] = @ProductID" 
SelectCommand="SELECT [ProductID], [ProductName], 
              [UnitPrice], [UnitsInStock] FROM [Products]" 
        
<DeleteParameters>
<asp:Parameter Name="ProductID" Type="Int32" />
</DeleteParameters>
</asp:SqlDataSource>
</div>


Add following CSS style in Head section of the page.
  

Build and run the code

AJax ConfirmButtonExtender With ModalPopUp In GridView Asp.Net

Download Sample Code


2

Auto Refresh Update GridView In Asp.Net Ajax With Timer

This Example describes How To Auto Refresh Or Update GridView Automatically At Regular Interval In Asp.Net Using Ajax And Timer.

Add GridView And Timer control inside UpdatePanel on the page and set Interval property to desired value in miliseconds. I have set it to 5000 (5 Seconds).

HTML SOURCE
   1:  <asp:ScriptManager ID="ScriptManager1" runat="server"/>
   2:  <asp:UpdatePanel ID="UpdatePanel1" runat="server">
   3:  <ContentTemplate>
   4:   
   5:  <asp:Timer ID="AutoRefreshTimer" runat="server" 
   6:             Interval="5000" 
   7:             ontick="AutoRefreshTimer_Tick"/>
   8:                              
   9:  <asp:GridView ID="GridView1" runat="server" 
  10:                AutoGenerateColumns="False" 
  11:                DataSourceID="SqlDataSource1">
  12:  <Columns>
  13:  <asp:BoundField DataField="FirstName" HeaderText="FirstName"/>
  14:  <asp:BoundField DataField="LastName" HeaderText="LastName"/>
  15:  <asp:BoundField DataField="Location" HeaderText="Location"/>
  16:  </Columns>
  17:  </asp:GridView>
  18:   
  19:  <asp:SqlDataSource ID="SqlDataSource1" runat="server" 
  20:  ConnectionString="<%$ ConnectionStrings:ConnectionString %>" 
  21:  SelectCommand="SELECT [FirstName], [LastName], [Location] 
  22:                 FROM [Details]">
  23:  </asp:SqlDataSource>
  24:   
  25:  <asp:Label ID="lblMsg" runat="server"/>
  26:  </ContentTemplate>
  27:  </asp:UpdatePanel>


Rebind GridView In Tick Event of Timer to refresh.

C#
protected void AutoRefreshTimer_Tick(object sender, EventArgs e)
    {
        GridView1.DataBind();
        lblMsg.Text = "Last Updated at " + DateTime.Now;
    }


Image below shows the implementation.

Automatically Refresh Update Asp.Net GridView with Ajax Timer

Hope this helps.

2

UpdateProgress Control Example In Asp.Net

This example shows How To Use UpdateProgress Control In Asp.Net with ProgressTemplate.

Update Progress can be used to display a animated GIF image or wait message using CSS while page is fetching or loading data.

I am displaying records in gridview in click event of button and processing message is displayed while data is retrieved.

Place ScriptManager on page and put Button,GridView,SqlDataSource and UpdateProgress controls inside ContentTemplate of UpdatePanel.

UpdateProgress Control Asp.Net


HTML SOURCE
<asp:ScriptManager ID="ScriptManager1" runat="server"/>
<asp:UpdatePanel ID="UpdatePanel1" runat="server">
<ContentTemplate>
 
<asp:Button ID="Button1" runat="server" onclick="Button1_Click" 
            Text="Show Records" />
           
<asp:GridView ID="GridView1" runat="server" 
              onpageindexchanging="GridView1_PageIndexChanging">
</asp:GridView>
<asp:SqlDataSource ID="SqlDataSource1" runat="server" 
ConnectionString="<%$ ConnectionStrings:ConnectionString %>" 
SelectCommand="SELECT [CustomerID], [ContactName], [City], 
               [Country] FROM [Customers]">
</asp:SqlDataSource>
           
<asp:UpdateProgress ID="UpdateProgress1" runat="server">
<ProgressTemplate>
<div id="Background"></div>
<div id="Progress">
<img src="loading.gif" style="vertical-align:middle"/>
Fetching Records Please Wait...
</div>
</ProgressTemplate>
</asp:UpdateProgress>
</ContentTemplate>
</asp:UpdatePanel>

Add these CSS styles in head section of page.

Write this code in Click Event of Button.
protected void Button1_Click(object sender, EventArgs e)
    {
        System.Threading.Thread.Sleep(2000);
        GridView1.DataSource = SqlDataSource1;
        GridView1.DataBind();
    }

Build and run the application.

1

Edit Update GridView With Ajax ModalPopUpExtender Example

This Example explains How To Edit Update GridView Rows Records With Ajax ModalPopUpExtender In Asp.Net Using C# and VB.NET.

I'm using northwind database and SqlDataSource control for record updation to reduce as much code behind as possible.

Create a Bin folder in solution explorer and put AjaxControlToolkit.dll in it.
Place ToolkitScriptManager and UpdatePanel on page, Configure SqlDataSource to fetch records from Employees table and assign it as DataSource of GridView.

Edit GridView With Ajax ModalPopUpExtender

Place Gridview inside ContentTemplate Add one ButtonField in Grid And define EmployeeID as it's DataKeyNames property.

HTML SOURCE OF GRIDVIEW
   1:  <Ajax:ToolkitScriptManager ID="ToolkitScriptManager1" 
   2:                             runat="server"/>
   3:  <asp:UpdatePanel ID="UpdatePanel1" runat="server">
   4:  <ContentTemplate>
   5:    
   6:  <asp:GridView ID="gvParent" runat="server" 
   7:                AutoGenerateColumns="False" 
   8:                DataKeyNames="EmployeeID" 
   9:                DataSourceID="SqlDataSource1" 
  10:                onrowcommand="gvParent_RowCommand">
  11:  <Columns>
  12:  <asp:ButtonField Text="Edit" CommandName="OpenPopUp"/>
  13:  <asp:BoundField DataField="EmployeeID" HeaderText="ID" 
  14:                  InsertVisible="False" ReadOnly="True" 
  15:                  SortExpression="EmployeeID"/>
  16:  <asp:BoundField DataField="LastName" HeaderText="LastName" 
  17:                  SortExpression="LastName"/>
  18:  <asp:BoundField DataField="FirstName" HeaderText="FirstName" 
  19:                  SortExpression="FirstName"/>
  20:  <asp:BoundField DataField="Country" HeaderText="Country" 
  21:                  SortExpression="Country"/>
  22:  </Columns>
  23:  </asp:GridView>
  24:   
  25:  <asp:SqlDataSource ID="SqlDataSource1" runat="server" 
  26:  ConnectionString=
  27:  "<%$ ConnectionStrings:NorthwindConnectionString %>" 
  28:  SelectCommand="SELECT [EmployeeID], [LastName], 
  29:                [FirstName], [Country] FROM [Employees]">
  30:  </asp:SqlDataSource>

Add one button on the page and set it's style display property to none. Drag ModalPopUpExtender on page and set it's properties as show below.
   1:  <asp:Button ID="btnPopUp" runat="server" 
   2:              style="display:none" />
   3:      
   4:  <Ajax:ModalPopupExtender ID="modalPopUpExtender1" 
   5:                           runat="server"
   6:                           TargetControlID="btnPopUp"
   7:                           PopupControlID="pnlModalPopUp"
   8:                           BackgroundCssClass="modalBackground"
   9:                           CancelControlID="btnCancel"
  10:                           X="20"
  11:                           Y="50">
  12:  </Ajax:ModalPopupExtender>

Place one Panel on the page and another gridview to edit records in popup, populate it using SqlDataSource2 with SelectParameters provided in RowCommand Event of parent Grid.
   1:  <asp:Panel runat="Server" ID="pnlModalPopUp">
   2:   
   3:  <asp:GridView ID="gvEdit" runat="server" 
   4:                AutoGenerateColumns="False" 
   5:                DataKeyNames="EmployeeID" 
   6:                DataSourceID="SqlDataSource2">
   7:  <Columns>
   8:  <asp:ButtonField Text="Update" CommandName="Update"/>
   9:  <asp:TemplateField HeaderText="Last Name">
  10:      <ItemTemplate>
  11:      <asp:TextBox ID="txtLastName" runat="server" 
  12:                   Text='<%# Bind("LastName") %>'/>
  13:      </ItemTemplate>
  14:  </asp:TemplateField>
  15:   
  16:  <asp:TemplateField HeaderText="First Name">
  17:      <ItemTemplate>
  18:      <asp:TextBox ID="txtFirstName" runat="server" 
  19:                   Text='<%# Bind("FirstName") %>'/>
  20:      </ItemTemplate>
  21:  </asp:TemplateField>
  22:   
  23:  <asp:TemplateField HeaderText="Country">
  24:      <ItemTemplate>
  25:      <asp:TextBox ID="txtCountry" runat="server" 
  26:                   Text='<%# Bind("Country") %>'/>
  27:      </ItemTemplate>
  28:  </asp:TemplateField>               
  29:  </Columns>
  30:  </asp:GridView>
  31:   
  32:  <asp:SqlDataSource ID="SqlDataSource2" runat="server" 
  33:                     onupdated="SqlDataSource2_Updated"
  34:                     ConnectionString=
  35:  "<%$ ConnectionStrings:NorthwindConnectionString %>" 
  36:  SelectCommand="SELECT [EmployeeID], [LastName], [FirstName], 
  37:                 [Country] FROM [Employees] 
  38:                 WHERE ([EmployeeID] = @EmployeeID)" 
  39:                     
  40:  UpdateCommand="UPDATE [Employees] SET [LastName] = @LastName, 
  41:                [FirstName] = @FirstName, [Country] = @Country 
  42:                WHERE [EmployeeID] = @EmployeeID">
  43:  <SelectParameters>
  44:  <asp:Parameter Name="EmployeeID" Type="Int32" />
  45:  </SelectParameters>
  46:   
  47:  <UpdateParameters>
  48:  <asp:Parameter Name="LastName" Type="String" />
  49:  <asp:Parameter Name="FirstName" Type="String" />
  50:  <asp:Parameter Name="Country" Type="String" />
  51:  <asp:Parameter Name="EmployeeID" Type="Int32" />
  52:  </UpdateParameters>
  53:  </asp:SqlDataSource>
  54:   
  55:  <asp:Button ID="btnCancel" runat="server" 
  56:              Text="Cancel"/>
  57:  </asp:Panel>
  58:  </ContentTemplate>
  59:  </asp:UpdatePanel>

Write this code in RowCommand Event of parent and Updated Event of SqlDataSource2 respectively.

C# CODE
protected void gvParent_RowCommand(object sender, GridViewCommandEventArgs e)
    {
        if (e.CommandName == "OpenPopUp")
        {
            lblMessage.Text = "";
            int rowIndex = Convert.ToInt32(e.CommandArgument);
            int id = Convert.ToInt32(gvParent.DataKeys[rowIndex].Value);
            SqlDataSource2.SelectParameters["EmployeeID"].DefaultValue = id.ToString();
            modalPopUpExtender1.Show();
        }
    }
    protected void SqlDataSource2_Updated(object sender, SqlDataSourceStatusEventArgs e)
    {
        gvParent.DataBind();
        lblMessage.Text = "Record Updated";
    }

VB.NET
Protected Sub gvParent_RowCommand(sender As Object, e As GridViewCommandEventArgs)
 If e.CommandName = "OpenPopUp" Then
  lblMessage.Text = ""
  Dim rowIndex As Integer = Convert.ToInt32(e.CommandArgument)
  Dim id As Integer = Convert.ToInt32(gvParent.DataKeys(rowIndex).Value)
  SqlDataSource2.SelectParameters("EmployeeID").DefaultValue = id.ToString()
  modalPopUpExtender1.Show()
 End If
End Sub
Protected Sub SqlDataSource2_Updated(sender As Object, e As SqlDataSourceStatusEventArgs)
 gvParent.DataBind()
 lblMessage.Text = "Record Updated"
End Sub

Build and run the application.

Download Sample Code


1

AsyncFileUpload Example In Asp.Net For Asynchronous Uploads

This example illustrate how to use Ajax AsycFileUpload Control In Asp.Net to upload files asynchronously with use of AjaxControlToolkit OnClientUploadComplete, OnUploadedComplete and OnClientUploadError events.

Download Latest AjaxControlToolkit and put it in Bin folder of your application. register it in html source of page using Register Assembly page directive at the top of page.

Drag and place ToolkitScriptManager, AsyncFileUpload Control  and one label from toolbox on page.label will be used to display success or failure message based on OnClientUploadComplete and OnClientUploadError event raised.

We also need to reset default file size limit of 4mb to enable large file uploads.

AsyncFileUpload example in asp.net ajax

HTML SOURCE OF PAGE
Register Toolkit
   1:  <%@ Page Language="C#" AutoEventWireup="true"  
   2:           CodeFile="Default.aspx.cs" Inherits="_Default" %>
   3:  <%@ Register Assembly="AjaxControlToolkit" 
   4:               Namespace="AjaxControlToolkit" 
   5:               TagPrefix="ajax" %>
   1:  <head runat="server">
   2:      <title></title>
   3:  <script type = "text/javascript">
   4:  function Success() 
   5:  {
   6:  document.getElementById("lblMessage").innerHTML = "File Uploaded";
   7:  }
   8:   
   9:  function Error() 
  10:  {
  11:  document.getElementById("lblMessage").innerHTML = "Upload failed.";
  12:  }
  13:  </script>
  14:  </head>
  15:  <body>
  16:  <form id="form1" runat="server">
  17:  <div>
  18:  <ajax:ToolkitScriptManager ID="ToolkitScriptManager1" 
  19:                             runat="server"/>
  20:   
  21:  <ajax:AsyncFileUpload ID="AsyncFileUpload1" runat="server" 
  22:                        OnUploadedComplete="SaveUploadedFile" 
  23:                        OnClientUploadComplete="Success" 
  24:                        UploaderStyle="Modern" 
  25:                        OnClientUploadError="Error" 
  26:                        ThrobberID="loader"/>
  27:  <asp:Image ID="loader" runat="server" 
  28:             ImageUrl ="~/Loader.gif"/>
  29:   <asp:Label ID="lblMessage" runat="server" Text=""/>
  30:  </form>
  31:  </body>

C# CODE
protected void SaveUploadedFile(object sender, EventArgs e)
    {
        string uploadedFileName = Path.GetFileName(AsyncFileUpload1.FileName);
        AsyncFileUpload1.SaveAs(Server.MapPath("~/") + uploadedFileName);
    }

VB.NET
Protected Sub SaveUploadedFile(sender As Object, e As EventArgs)
 Dim uploadedFileName As String = Path.GetFileName(AsyncFileUpload1.FileName)
 AsyncFileUpload1.SaveAs(Server.MapPath("~/") & uploadedFileName)
End Sub


Download Sample Code


2

FileUpload In UpdatePanel HasFile Returns False Asp.Net Ajax

This example shows how to use FileUpload Control In UpdatePanel Using Asp.Net Ajax when FileUpload.HasFile method returns false inside Update Panel.

If you are uploading files with FileUpload Inside Ajax UpdatePanel, Upload fails because few controls doesn't work with Ajax Partial postbacks.

FileUpload HasFile Return False In UpdatePanel

To make full page postback for uploads to work we need to define PostBackTrigger for upload button outside ContentTemplate in html source.

HTML SOURCE
   1:  <asp:ScriptManager ID="ScriptManager1" runat="server"/>
   2:   
   3:  <asp:UpdatePanel ID="UpdatePanel1" runat="server">
   4:  <ContentTemplate>
   5:  <asp:FileUpload ID="FileUpload1" runat="server" />
   6:  <asp:Button ID="btnUpload" runat="server" 
   7:              Text="Upload File" 
   8:              onclick="btnUpload_Click"/>
   9:  <asp:Label ID="lblMessage" runat="server"></asp:Label>
  10:  </ContentTemplate>
  11:   
  12:  <Triggers>
  13:  <asp:PostBackTrigger ControlID="btnUpload" />
  14:  </Triggers>
  15:  </asp:UpdatePanel>

Now we can write code in Click Event of Button to Upload Files With FileUpload Control In UpdatePanel.
protected void btnUpload_Click(object sender, EventArgs e)
    {
        if (FileUpload1.HasFile)
        {
            string fileName = FileUpload1.PostedFile.FileName;
            FileUpload1.SaveAs(Server.MapPath("~/Uploads/" + fileName));
            lblMessage.Text = "File uploaded successfully";
        }
    }

FileUpload Control In UpdatePanel Asp.Net Ajax


5

CalendarExtender CSS Class Style And Themes Asp.Net Ajax

In this example i'm showing how to use CSS Styles And themes In Ajax Calendar Extender Asp.Net. Add new StyleSheet In your application, name it black.css and add it's referenece in head section of aspx page.

Write following CSS styles in it to change look of Calendar Extender Using it's CssClass property to apply style or theme you want.

Ajax Calendar Extender CSSClass Style Theme


CSS Style
.black .ajax__calendar_container
{
width:190px;
background-color: #000000; border:solid 1px #666666;
-moz-border-radius-topleft: 8px; -webkit-border-top-left-radius: 8px; -khtml-border-top-left-radius: 8px; border-top-left-radius: 8px;
-moz-border-radius-topright: 8px; -webkit-border-top-right-radius: 8px; -khtml-border-top-right-radius: 8px; border-top-right-radius: 8px; 
-moz-border-radius-bottomleft: 8px; -webkit-border-bottom-left-radius: 8px; -khtml-border-bottom-left-radius: 8px; border-bottom-left-radius: 8px;
-moz-border-radius-bottomright: 8px; -webkit-border-bottom-right-radius: 8px; -khtml-border-bottom-right-radius: 8px; border-bottom-right-radius: 8px;
}
.black .ajax__calendar_body
{
width:180px;
height:150px;
background-color: #000000; border: solid 1px #666666;
}
.black .ajax__calendar_header
{
background-color: #626262; margin-bottom: 8px;
-moz-border-radius-topleft: 4px; -webkit-border-top-left-radius: 4px; -khtml-border-top-left-radius: 4px; border-top-left-radius: 4px;
-moz-border-radius-topright: 4px; -webkit-border-top-right-radius: 4px; -khtml-border-top-right-radius: 4px; border-top-right-radius: 4px; 
-moz-border-radius-bottomleft: 4px; -webkit-border-bottom-left-radius: 4px; -khtml-border-bottom-left-radius: 4px; border-bottom-left-radius: 4px;
-moz-border-radius-bottomright: 4px; -webkit-border-bottom-right-radius: 4px; -khtml-border-bottom-right-radius: 4px; border-bottom-right-radius: 4px;
} 
.black .ajax__calendar_title
{
color: #ffffff; padding-top: 3px;
}
.black .ajax__calendar_next,
.black .ajax__calendar_prev
{
border:solid 4px #ffffff;
background-color: #ffffff;
-moz-border-radius-topleft: 18px; -webkit-border-top-left-radius: 18px; -khtml-border-top-left-radius: 18px; border-top-left-radius: 18px;
-moz-border-radius-topright: 18px; -webkit-border-top-right-radius: 18px; -khtml-border-top-right-radius: 18px; border-top-right-radius: 18px; 
-moz-border-radius-bottomleft: 18px; -webkit-border-bottom-left-radius: 18px; -khtml-border-bottom-left-radius: 18px; border-bottom-left-radius: 18px;
-moz-border-radius-bottomright: 18px; -webkit-border-bottom-right-radius: 18px; -khtml-border-bottom-right-radius: 18px; border-bottom-right-radius: 18px;
}
.black .ajax__calendar_hover .ajax__calendar_next,
.black .ajax__calendar_hover .ajax__calendar_prev
{
border:solid 4px #328BC8;
background-color: #ffffff;
-moz-border-radius-topleft: 4px; -webkit-border-top-left-radius: 4px; -khtml-border-top-left-radius: 4px; border-top-left-radius: 4px;
-moz-border-radius-topright: 4px; -webkit-border-top-right-radius: 4px; -khtml-border-top-right-radius: 4px; border-top-right-radius: 4px; 
-moz-border-radius-bottomleft: 4px; -webkit-border-bottom-left-radius: 4px; -khtml-border-bottom-left-radius: 4px; border-bottom-left-radius: 4px;
-moz-border-radius-bottomright: 4px; -webkit-border-bottom-right-radius: 4px; -khtml-border-bottom-right-radius: 4px; border-bottom-right-radius: 4px;
}
.black .ajax__calendar_dayname
{
text-align:center; margin-bottom: 4px; margin-top: 2px;
color:#ffffff;
background-color: #000000;
} 
.black .ajax__calendar_day,
.black .ajax__calendar_month,
.black .ajax__calendar_year
{
margin:1px 1px 1px 1px;
text-align:center;
border:solid 1px #000000;
color:#ffffff;
background-color: #626262;
}
.black .ajax__calendar_hover .ajax__calendar_day,
.black .ajax__calendar_hover .ajax__calendar_month,
.black .ajax__calendar_hover .ajax__calendar_year
{
color: #ffffff; font-weight:bold; background-color: #328BC8;border:solid 1px #328BC8;
}
.black .ajax__calendar_active .ajax__calendar_day,
.black .ajax__calendar_active .ajax__calendar_month,
.black .ajax__calendar_active .ajax__calendar_year
{
color: #ffffff; font-weight:bold; background-color: #F7B64A; 
}
.black .ajax__calendar_today .ajax__calendar_day
{
color: #ffffff; font-weight:bold; background-color: #F7B64A; 
}
.black .ajax__calendar_other,
.black .ajax__calendar_hover .ajax__calendar_today
{
color: #ffffff;
font-weight:bold;
}
.black .ajax__calendar_days
{
background-color: #000000;
}


Set CSS Class In HTML SOURCE of Calendar Extender
   1:  <head runat="server">
   2:  <link href="black.css" rel="stylesheet" type="text/css"/>
   3:  </head>
   4:   
   5:  <Ajax:ToolkitScriptManager ID="ToolkitScriptManager1" 
   6:                             runat="server"/>
   7:         
   8:  Pick a date: <asp:TextBox ID="txtCal" runat="server"/>
   9:   
  10:  <Ajax:CalendarExtender ID="CalendarExtender1" 
  11:                         runat="server" 
  12:                         TargetControlID="txtCal" 
  13:                         CssClass="black">
  14:  </Ajax:CalendarExtender>


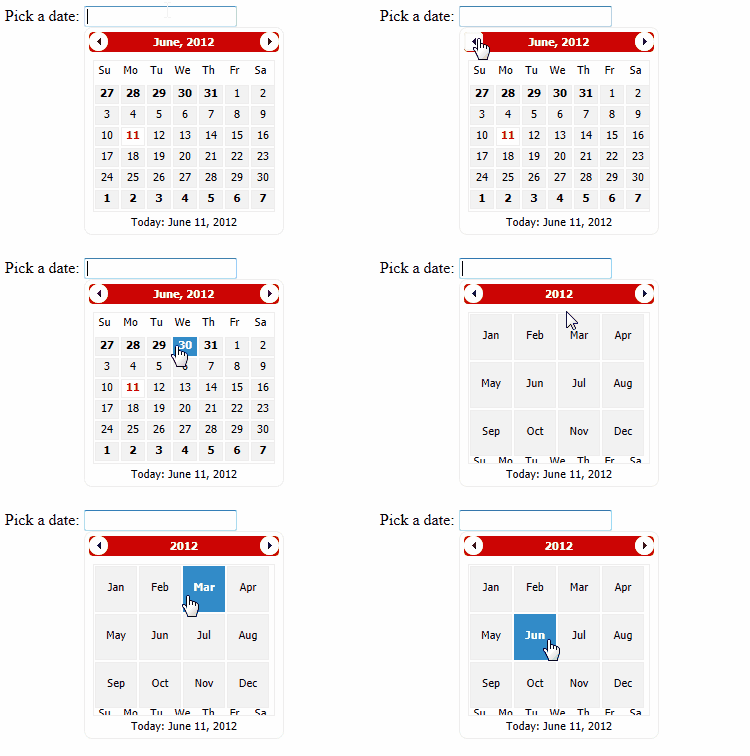
Similarly we can create other Ajax Calendar Extender themes and Styles as shown below in images, these are included in source code.

Ajax Calendar Extender CSS Styles

Ajax Calendar Extender Themes


Download Sample Code


Find More Articles