0

A Potentially Dangerous Request.Form Value Was Detected From Client

A potentially dangerous Request.Form value was detected from the client.

This "A potentially dangerous Request.Form value was detected from the client" error occurs when user enter any script tag <> like or any html <> tag like etc in textbox.

Potentially dengerous requestForm error

Reason for this is asp.net prevent any attempt to compromise the security of application by script injection like cross site scriptiong etc through textbox.

To resolve this issue we can do following things.


1. Set validateRequest property to false in page directive.

<%@ Page Language="C#" AutoEventWireup="true"  CodeFile="Default.aspx.cs"
Inherits="_Default" ValidateRequest="false" %>

2.You can set ValidateRequest property to false in web.config if you want to turn validateRequest off for the whole application
<configuration>
  <configuration>
    <system.web>
      <pages validateRequest="false" />
    </system.web>
</configuration>

3. If you don't want to set validateRequest to false then use methods like regular expression or replace() to check for any special character or script tag entry in text box

<asp:textbox id="TextBox2" runat="server"
             onblur="this.value = this.value.replace(/&lt;\/?[^>]+>/gi, '');">
</asp:textbox>

hope this helps.


1

Write Modify Web.Config Programmatically At Run Time

Write Modify Web.Config ConnectionString And AppSettings Programmatically At Run Time In Asp.Net

In this post I'm going to explain how to write or modify CnnectionStrings and AppSettings programmatically at run time in Web.Config file in Asp.Net.

Write web.config programmatically
To write or modify web.config programmatically we need to use ebConfigurationManager Class in System.Web.Configuration namespace.


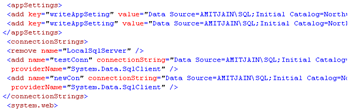
We can add write or modify any section of web.config programmatically, here i m describing how to modify and write connectionStrings and AppSettings section of Web.Config file.

For this first of all add this namespace in code behind of page.

using System.Web.Configuration;

I have put two textbox on the page to display on Page Load and write new or modify existing connectionString in web.config file on Button Click Event.

HTML SOURCE OF PAGE
<form id="form1" runat="server">
<div>
<asp:TextBox ID="txtKey" runat="server">
</asp:TextBox>
<asp:TextBox ID="txtConnectionString" runat="server">
</asp:TextBox>
<asp:Button ID="btnWrite" runat="server" 
            onclick="btnWrite_Click" 
            Text="Modify/Write" />
</div>
</form>

Write below mentioned code in code behind of page to show existing connectionString in web.config on page Load.

C# CODE
protected void Page_Load(object sender, EventArgs e)
    {
        if (!IsPostBack)
        {
          txtConnectionString.Text = ConfigurationManager.ConnectionStrings[0].ConnectionString;
            
        }
    }

VB.NET CODE
Protected Sub Page_Load(sender As Object, e As EventArgs)
 If Not IsPostBack Then

  txtConnectionString.Text = ConfigurationManager.ConnectionStrings(0).ConnectionString
 End If
End Sub

To modify name of existing connection string in web.config programmatically write below mentioned code in Click Event of Button.

C# CODE
protected void btnWrite_Click(object sender, EventArgs e)
    {
        Configuration connectionConfiguration = WebConfigurationManager.OpenWebConfiguration("~");
        connectionConfiguration.ConnectionStrings.ConnectionStrings["test"].Name = txtKey.Text;
        connectionConfiguration.Save(ConfigurationSaveMode.Modified);
        ConfigurationManager.RefreshSection("connectionStrings");
    }

To modify value of existing connection string in web.config programmatically write below mentioned code in Click Event of Button.

C# CODE
protected void btnWrite_Click(object sender, EventArgs e)
    {
        Configuration connectionConfiguration = WebConfigurationManager.OpenWebConfiguration("~");
        connectionConfiguration.ConnectionStrings.ConnectionStrings["test"].ConnectionString = txtConnectionString.Text;
connectionConfiguration.Save(ConfigurationSaveMode.Modified);
ConfigurationManager.RefreshSection("connectionStrings");

VB.NET CODE
Protected Sub btnWrite_Click(sender As Object, e As EventArgs)
 Dim connectionConfiguration As Configuration = WebConfigurationManager.OpenWebConfiguration("~")
 connectionConfiguration.ConnectionStrings.ConnectionStrings("test").Name = txtKey.Text
 connectionConfiguration.ConnectionStrings.ConnectionStrings("test").ConnectionString = txtConnectionString.Text
 connectionConfiguration.Save(ConfigurationSaveMode.Modified)
 ConfigurationManager.RefreshSection("connectionStrings")
End Sub

To add or write new name and value of connection string in web.config at run time write below mentioned code

C# CODE
protected void btnWrite_Click(object sender, EventArgs e)
    {
        Configuration connectionConfiguration = WebConfigurationManager.OpenWebConfiguration("~");
        
        ConnectionStringSettings csAddNewConString = new ConnectionStringSettings(txtKey.Text,txtConnectionString.Text ,"System.Data.SqlClient");
        
 ConnectionStringsSection csNewConSection = connectionConfiguration.ConnectionStrings;
        
 csNewConSection.ConnectionStrings.Add(csAddNewConString);
        
        connectionConfiguration.Save(ConfigurationSaveMode.Modified);

        ConfigurationManager.RefreshSection("connectionStrings");
    }

VB.NET CODE
Protected Sub btnWrite_Click(sender As Object, e As EventArgs)
 Dim connectionConfiguration As Configuration = WebConfigurationManager.OpenWebConfiguration("~")

 Dim csAddNewConString As New ConnectionStringSettings(txtKey.Text, txtConnectionString.Text, "System.Data.SqlClient")

 Dim csNewConSection As ConnectionStringsSection = connectionConfiguration.ConnectionStrings

 csNewConSection.ConnectionStrings.Add(csAddNewConString)

 connectionConfiguration.Save(ConfigurationSaveMode.Modified)

 ConfigurationManager.RefreshSection("connectionStrings")
End Sub


To write or add new key and value of connectionstring in AppSettings Section of web.config we can write code as mentioned below.

C# CODE
protected void btnWrite_Click(object sender, EventArgs e)
    {
        Configuration connectionConfiguration = WebConfigurationManager.OpenWebConfiguration("~");
        
        connectionConfiguration.AppSettings.Settings.Add("writeAppSettingsString", txtConnectionString.Text);
        
        connectionConfiguration.Save(ConfigurationSaveMode.Modified);
        
        ConfigurationManager.RefreshSection("connectionStrings");
    }

VB.NET CODE
Protected Sub btnWrite_Click(sender As Object, e As EventArgs)
 Dim connectionConfiguration As Configuration = WebConfigurationManager.OpenWebConfiguration("~")

 connectionConfiguration.AppSettings.Settings.Add("writeAppSettingsString", txtConnectionString.Text)

 connectionConfiguration.Save(ConfigurationSaveMode.Modified)

 ConfigurationManager.RefreshSection("connectionStrings")
End Sub

To remove any existing connection string in AppSettings we can use Remove() method

connectionConfiguration.AppSettings.Settings.Remove("writeAppSettingsString");

Hope this helps.


5

GridView XML Edit Delete Insert Update

GridView XML Edit Delete Insert Update. In this example i'm explaining how to Edit Delete Insert and update XML file data in GridView using C# and VB.Net in Asp.Net.

GridView Xml Edit Delete Insert Update Asp.Net
I have created a XML file with three fields Firstname,LastName and Location.

XML file looks like mentioned below.


Amit Jain Mumbai
User 3 Noida
User 4 Bangalore

I have placed one gridview on aspx page and three textbox in editItemTemplate of gridview for editing, one button and three textbox in Footer Template for Inserting new records in XML file.

HTML SOURCE OF PAGE
<asp:GridView ID="GridView1" runat="server" 
              AutoGenerateColumns="False" ShowFooter="True" 
              onrowcancelingedit="GridView1_RowCancelingEdit" 
              onrowdeleting="GridView1_RowDeleting" 
              onrowediting="GridView1_RowEditing" 
              onrowupdating="GridView1_RowUpdating" 
              onrowcommand="GridView1_RowCommand">
<Columns>
<asp:CommandField ShowEditButton="true" />
<asp:CommandField ShowDeleteButton="true" />
 
<asp:TemplateField HeaderText="First Name">
<ItemTemplate>
<asp:Label ID="lblFname" runat="server" Text='<%#Eval("FirstName") %>'/>
</ItemTemplate>
<EditItemTemplate>
<asp:TextBox ID="txtFirstName" runat="server" Text='<%#Bind("FirstName")%>'/>
</EditItemTemplate>
<FooterTemplate>
<asp:Button ID="btn" runat="server" Text="Insert" CommandName="InsertXMLData"/>
<asp:TextBox ID="txtFirstNameInsert" runat="server"/>
</FooterTemplate>
</asp:TemplateField>
 
<asp:TemplateField HeaderText="Last Name">
<ItemTemplate>
<asp:Label ID="lblLname" runat="server" Text='<%#Eval("LastName") %>'/>
</ItemTemplate>
<EditItemTemplate>
<asp:TextBox ID="txtLastName" runat="server" Text='<%#Bind("LastName") %>'/>
</EditItemTemplate>
<FooterTemplate>
<asp:TextBox ID="txtLastNameInsert" runat="server"/>
</FooterTemplate>
</asp:TemplateField>
 
<asp:TemplateField HeaderText="Location">
<ItemTemplate>
<asp:Label ID="lblLocation" runat="server" Text='<%#Eval("Location") %>'/>
</ItemTemplate>
<EditItemTemplate>
<asp:TextBox ID="txtLocation" runat="server" Text='<%#Bind("Location") %>'/>
</EditItemTemplate>
<FooterTemplate>
<asp:TextBox ID="txtLocationInsert" runat="server"/>
</FooterTemplate>
</asp:TemplateField>
</Columns>
</asp:GridView>


c# CODE
protected void Page_Load(object sender, EventArgs e)
    {
        if (!Page.IsPostBack)
            BindGridView();
    }
    protected void BindGridView()
    {
        DataSet dsXML = new DataSet();
        dsXML.ReadXml(Server.MapPath("~/App_Data/XMLFile.xml"));
        GridView1.DataSource = dsXML;
        GridView1.DataBind();
        GridView1.ShowFooter = true;
    }

    protected void GridView1_RowDeleting(object sender, GridViewDeleteEventArgs e)
    {
        BindGridView();
        DataSet dsGrid = (DataSet)GridView1.DataSource;
        dsGrid.Tables[0].Rows[GridView1.Rows[e.RowIndex].DataItemIndex].Delete();
        dsGrid.WriteXml(Server.MapPath("~/App_Data/XMLFile.xml"));
        BindGridView();

    }
    protected void GridView1_RowEditing(object sender, GridViewEditEventArgs e)
    {
        GridView1.ShowFooter = false;
        GridView1.EditIndex = e.NewEditIndex;
        BindGridView();
    }
    protected void GridView1_RowUpdating(object sender, GridViewUpdateEventArgs e)
    {
        int index = GridView1.Rows[e.RowIndex].DataItemIndex;
        string firstName = ((TextBox)GridView1.Rows[e.RowIndex].FindControl("txtFirstName")).Text;
        string lastName = ((TextBox)GridView1.Rows[e.RowIndex].FindControl("txtLastName")).Text;
        string location = ((TextBox)GridView1.Rows[e.RowIndex].FindControl("txtLocation")).Text;
        GridView1.EditIndex = -1;
        BindGridView();
        DataSet dsUpdate = (DataSet)GridView1.DataSource;
        dsUpdate.Tables[0].Rows[index]["FirstName"] = firstName;
        dsUpdate.Tables[0].Rows[index]["LastName"] = lastName;
        dsUpdate.Tables[0].Rows[index]["Location"] = location;
        dsUpdate.WriteXml(Server.MapPath("~/App_Data/XMLFile.xml"));
        BindGridView();
        
    }
    protected void GridView1_RowCancelingEdit(object sender, GridViewCancelEditEventArgs e)
    {
        GridView1.EditIndex = -1;
        BindGridView();
    }

    protected void GridView1_RowCommand(object sender, GridViewCommandEventArgs e)
    {
        
        if(e.CommandName == "InsertXMLData")
        {
        string firstname = ((TextBox)GridView1.FooterRow.FindControl("txtFirstNameInsert")).Text;
        string lastname = ((TextBox)GridView1.FooterRow.FindControl("txtLastNameInsert")).Text;
        string location = ((TextBox)GridView1.FooterRow.FindControl("txtLocationInsert")).Text;
        BindGridView();
        DataSet dsInsert = (DataSet)GridView1.DataSource;
        DataRow drInsert = dsInsert.Tables[0].NewRow();
        drInsert["FirstName"] = firstname;
        drInsert["LastName"] = lastname;
        drInsert["Location"] = location;
        dsInsert.Tables[0].Rows.Add(drInsert);
        dsInsert.WriteXml(Server.MapPath("~/App_Data/XMLFile.xml"));
        BindGridView();
        }
    }

VB.NET
Protected Sub Page_Load(sender As Object, e As EventArgs)
 If Not Page.IsPostBack Then
  BindGridView()
 End If
End Sub
Protected Sub BindGridView()
 Dim dsXML As New DataSet()
 dsXML.ReadXml(Server.MapPath("~/App_Data/XMLFile.xml"))
 GridView1.DataSource = dsXML
 GridView1.DataBind()
 GridView1.ShowFooter = True
End Sub

Protected Sub GridView1_RowDeleting(sender As Object, e As GridViewDeleteEventArgs)
 BindGridView()
 Dim dsGrid As DataSet = DirectCast(GridView1.DataSource, DataSet)
 dsGrid.Tables(0).Rows(GridView1.Rows(e.RowIndex).DataItemIndex).Delete()
 dsGrid.WriteXml(Server.MapPath("~/App_Data/XMLFile.xml"))
 BindGridView()

End Sub
Protected Sub GridView1_RowEditing(sender As Object, e As GridViewEditEventArgs)
 GridView1.ShowFooter = False
 GridView1.EditIndex = e.NewEditIndex
 BindGridView()
End Sub
Protected Sub GridView1_RowUpdating(sender As Object, e As GridViewUpdateEventArgs)
 Dim index As Integer = GridView1.Rows(e.RowIndex).DataItemIndex
 Dim firstName As String = DirectCast(GridView1.Rows(e.RowIndex).FindControl("txtFirstName"), TextBox).Text
 Dim lastName As String = DirectCast(GridView1.Rows(e.RowIndex).FindControl("txtLastName"), TextBox).Text
 Dim location As String = DirectCast(GridView1.Rows(e.RowIndex).FindControl("txtLocation"), TextBox).Text
 GridView1.EditIndex = -1
 BindGridView()
 Dim dsUpdate As DataSet = DirectCast(GridView1.DataSource, DataSet)
 dsUpdate.Tables(0).Rows(index)("FirstName") = firstName
 dsUpdate.Tables(0).Rows(index)("LastName") = lastName
 dsUpdate.Tables(0).Rows(index)("Location") = location
 dsUpdate.WriteXml(Server.MapPath("~/App_Data/XMLFile.xml"))
 BindGridView()

End Sub
Protected Sub GridView1_RowCancelingEdit(sender As Object, e As GridViewCancelEditEventArgs)
 GridView1.EditIndex = -1
 BindGridView()
End Sub

Protected Sub GridView1_RowCommand(sender As Object, e As GridViewCommandEventArgs)

 If e.CommandName = "InsertXMLData" Then
  Dim firstname As String = DirectCast(GridView1.FooterRow.FindControl("txtFirstNameInsert"), TextBox).Text
  Dim lastname As String = DirectCast(GridView1.FooterRow.FindControl("txtLastNameInsert"), TextBox).Text
  Dim location As String = DirectCast(GridView1.FooterRow.FindControl("txtLocationInsert"), TextBox).Text
  BindGridView()
  Dim dsInsert As DataSet = DirectCast(GridView1.DataSource, DataSet)
  Dim drInsert As DataRow = dsInsert.Tables(0).NewRow()
  drInsert("FirstName") = firstname
  drInsert("LastName") = lastname
  drInsert("Location") = location
  dsInsert.Tables(0).Rows.Add(drInsert)
  dsInsert.WriteXml(Server.MapPath("~/App_Data/XMLFile.xml"))
  BindGridView()
 End If
End Sub

Build and run the application.

Download Sample Code


8

Upload And Read Excel File Into DataTable DataSet Asp.Net

This example explains How To Upload And Read Excel File Data Into DataTable DataSet Using FileUpload and display in gridview using C# and VB.NET in Asp.Net.

Upload and Read Excel File Data into datatable Asp.Net
First of all put a fileUpload control, and a GridView in design view of aspx page to upload and display excel file data.

Now place a button on the page, in click even of this button we will be uploading the excel file in a folder on server and read it's content.


HTML SOURCE OF PAGE
<form id="form1" runat="server">
<div>
    
<asp:FileUpload ID="FileUpload1" runat="server" />
<asp:Button ID="btnUpload" runat="server" 
            Height="21px" Text="Upload" 
            Width="92px" onclick="btnUpload_Click"/>
</div>
<asp:GridView ID="GridView1" runat="server">
</asp:GridView>
</form>

Add these namespaces in code behind of page

using System.IO;
using System.Data.OleDb;
using System.Data;

Write below mentioned code in Click Event of Upload Button

C# CODE
protected void btnUpload_Click(object sender, EventArgs e)
    {
        string connectionString ="";
        if (FileUpload1.HasFile)
        {
            string fileName = Path.GetFileName(FileUpload1.PostedFile.FileName);
            string fileExtension = Path.GetExtension(FileUpload1.PostedFile.FileName);
            string fileLocation = Server.MapPath("~/App_Data/" + fileName);
            FileUpload1.SaveAs(fileLocation);
            
            //Check whether file extension is xls or xslx

            if (fileExtension == ".xls")
            {
                connectionString = "Provider=Microsoft.Jet.OLEDB.4.0;Data Source=" + fileLocation + ";Extended Properties=\"Excel 8.0;HDR=Yes;IMEX=2\""; 
            }
            else if (fileExtension == ".xlsx")
            {
                connectionString = "Provider=Microsoft.ACE.OLEDB.12.0;Data Source=" + fileLocation + ";Extended Properties=\"Excel 12.0;HDR=Yes;IMEX=2\"";
            }

            //Create OleDB Connection and OleDb Command

            OleDbConnection con = new OleDbConnection(connectionString);
            OleDbCommand cmd = new OleDbCommand();
            cmd.CommandType = System.Data.CommandType.Text;
            cmd.Connection = con;
            OleDbDataAdapter dAdapter = new OleDbDataAdapter(cmd);
            DataTable dtExcelRecords = new DataTable();
            con.Open();
            DataTable dtExcelSheetName = con.GetOleDbSchemaTable(OleDbSchemaGuid.Tables, null);
            string getExcelSheetName = dtExcelSheetName.Rows[0]["Table_Name"].ToString();
            cmd.CommandText = "SELECT * FROM [" + getExcelSheetName +"]";
            dAdapter.SelectCommand = cmd;
            dAdapter.Fill(dtExcelRecords);
            con.Close();
            GridView1.DataSource = dtExcelRecords;
            GridView1.DataBind();
        }
    }

VB.NET CODE

Protected Sub btnUpload_Click(sender As Object, e As EventArgs)
 Dim connectionString As String = ""
 If FileUpload1.HasFile Then
  Dim fileName As String = Path.GetFileName(FileUpload1.PostedFile.FileName)
  Dim fileExtension As String = Path.GetExtension(FileUpload1.PostedFile.FileName)
  Dim fileLocation As String = Server.MapPath("~/App_Data/" & fileName)
  FileUpload1.SaveAs(fileLocation)

  'Check whether file extension is xls or xslx

  If fileExtension = ".xls" Then
   connectionString = "Provider=Microsoft.Jet.OLEDB.4.0;Data Source=" & fileLocation & ";Extended Properties=""Excel 8.0;HDR=Yes;IMEX=2"""
  ElseIf fileExtension = ".xlsx" Then
   connectionString = "Provider=Microsoft.ACE.OLEDB.12.0;Data Source=" & fileLocation & ";Extended Properties=""Excel 12.0;HDR=Yes;IMEX=2"""
  End If

  'Create OleDB Connection and OleDb Command

  Dim con As New OleDbConnection(connectionString)
  Dim cmd As New OleDbCommand()
  cmd.CommandType = System.Data.CommandType.Text
  cmd.Connection = con
  Dim dAdapter As New OleDbDataAdapter(cmd)
  Dim dtExcelRecords As New DataTable()
  con.Open()
  Dim dtExcelSheetName As DataTable = con.GetOleDbSchemaTable(OleDbSchemaGuid.Tables, Nothing)
  Dim getExcelSheetName As String = dtExcelSheetName.Rows(0)("Table_Name").ToString()
  cmd.CommandText = "SELECT * FROM [" & getExcelSheetName & "]"
  dAdapter.SelectCommand = cmd
  dAdapter.Fill(dtExcelRecords)
  con.Close()
  GridView1.DataSource = dtExcelRecords
  GridView1.DataBind()
 End If
End Sub

Build and run the application.


In this code if the excel sheet contains text characters or special characters in numeric field like EmpID, then it's not read by C# or VB.NET and display blank in gridview as shown in Image.

ReadExcel Error
The reason for this is excel doesn't handle mixed data format very well, entry like 1A or 1-A etc doesn't get read by this code.

To fix this error we need to make some changes in connection string of excel, and need to add some extended properties, change the connection string as shown below.


connectionString = "Provider=Microsoft.Jet.OLEDB.4.0;Data Source=" + fileLocation + @";Extended Properties=" + Convert.ToChar(34).ToString() + @"Excel 8.0;Imex=1;HDR=Yes;" + Convert.ToChar(34).ToString();

Now it will read the excel sheet without any errors.


Download Sample Code


2

VisualStudio Setup Project Updates Version Already Installed Error

Visual Studio Setup Project Updates Another Version Of This Product Is Already Installed Error In Windows Forms or WinForms .

Setup Project Another version already installed error

When we make changes or update in windows forms or winforms application and create setup project to reinstall the application, we get below mentioned error.

Another version of this product is already installed. Installation of this version can not continue.
To configure or remove theexisting version of this product use Add/Remove programs on the control panel.


This error comes because of the same product code and version of application already installed.

To get rid of it we need to configure our setup project as mentioned below.

1. Select and highlight your setup project in solution explorer window.

Highlight setupproject

2. press F4 key to open properties window.

Change version of setup project

3. In this window, RemovePreviousVersions property is set to false by default, change it to TRUE.

4. change last digit of version (something like 1.0.11).

Click yes on next confirmation screen.

Now you need to build setup project again

Right click on setup project name and select BUILD.

now try to install the application over existing one and you won''t get the error.


5

Read CSV File And Save To SQL Server In ASP.NET C# VB.NET

Read CSV File or Data In ASP.NET using C# VB.NET And save to MS SQL Server.

In this example i'm explaining how to read CSV file and save data to sql server.

My sql table has 3 columns FirstName,LastName and Department. and i m using datatable to read Data from CSV file and temporarily storing in datatable.

First of all you need to add reference to Microsoft.VisualBasic dll by rightclicking in solution explorer,select add reference and select microsoft.VisualBasic from list.


Add these namespaces in code behind of page.

using System.Data;
using System.Data.SqlClient;
using Microsoft.VisualBasic.FileIO;

Now write below mentioned code in click event of button.

C# CODE
protected void Button1_Click(object sender, EventArgs e)
    {
        DataTable tblReadCSV = new DataTable();

        tblReadCSV.Columns.Add("FirstName");
        tblReadCSV.Columns.Add("LastName");
        tblReadCSV.Columns.Add("Department");

        TextFieldParser csvParser = new TextFieldParser("C:\\test.txt");

        csvParser.Delimiters = new string[] { "," };
        csvParser.TrimWhiteSpace = true;
        csvParser.ReadLine();

        while (!(csvParser.EndOfData == true))
        {
            tblReadCSV.Rows.Add(csvParser.ReadFields());
        }

        //Create SQL Connection, Sql Command and Sql DataAdapter to save CSV data into SQL Server 
        string strCon = ConfigurationManager.ConnectionStrings["testdbConnectionString"].ConnectionString;
        string strSql = "Insert into Employees(FirstName,LastName,Department) values(@Fname,@Lname,@Dept)";
        SqlConnection con = new SqlConnection(strCon);
        SqlCommand cmd = new SqlCommand();
        cmd.CommandType = CommandType.Text;
        cmd.CommandText = strSql;
        cmd.Connection = con;
        cmd.Parameters.Add("@Fname", SqlDbType.VarChar, 50, "FirstName");
        cmd.Parameters.Add("@Lname", SqlDbType.VarChar, 50, "LastName");
        cmd.Parameters.Add("@Dept", SqlDbType.VarChar, 50, "Department");

        SqlDataAdapter dAdapter = new SqlDataAdapter();
        dAdapter.InsertCommand = cmd;
        int result = dAdapter.Update(tblReadCSV);
        
    }

VB.NET CODE
Protected Sub Button1_Click(sender As Object, e As EventArgs)
 Dim tblReadCSV As New DataTable()

 tblReadCSV.Columns.Add("FirstName")
 tblReadCSV.Columns.Add("LastName")
 tblReadCSV.Columns.Add("Department")

 Dim csvParser As New TextFieldParser("C:\test.txt")

 csvParser.Delimiters = New String() {","}
 csvParser.TrimWhiteSpace = True
 csvParser.ReadLine()

 While Not (csvParser.EndOfData = True)
  tblReadCSV.Rows.Add(csvParser.ReadFields())
 End While

 'Create SQL Connection, Sql Command and Sql DataAdapter to save CSV data into SQL Server 
 Dim strCon As String = ConfigurationManager.ConnectionStrings("testdbConnectionString").ConnectionString
 Dim strSql As String = "Insert into Employees(FirstName,LastName,Department) values(@Fname,@Lname,@Dept)"
 Dim con As New SqlConnection(strCon)
 Dim cmd As New SqlCommand()
 cmd.CommandType = CommandType.Text
 cmd.CommandText = strSql
 cmd.Connection = con
 cmd.Parameters.Add("@Fname", SqlDbType.VarChar, 50, "FirstName")
 cmd.Parameters.Add("@Lname", SqlDbType.VarChar, 50, "LastName")
 cmd.Parameters.Add("@Dept", SqlDbType.VarChar, 50, "Department")

 Dim dAdapter As New SqlDataAdapter()
 dAdapter.InsertCommand = cmd
 Dim result As Integer = dAdapter.Update(tblReadCSV)

End Sub

Build and Run the code.

Download Sample Code


3

GridView XMLDataSource Example

GridView XMLDataSource Example. In this post i'm explaining how to use XML file or XML data as XMLDataSource to populate GridView in Asp.Net 2.0,3.5,4.0.

GridView XMLDataSource Example

For this example i have created a simple xml file and added it in App_Data Folder of Asp.Net application.


The data in XML file look like shown below.


Amit Jain Mumbai
user 1 Delhi
User 2 Noida
User 3 Bangalore

First of All Add a GridView on aspx page and click on smart tag in design view of page and select new data source.
Browse to xml file path and click on ok.

XMLDataSource

When we click on ok we get error as displayed in the image.

XMLDataSource Error

The data source for GridView with id 'GridView1' did not have any properties or attributes from which to generate columns. Ensure that your data source has content.

This error is caused because the XML data is not in the format gridview can read.

GridView needs XML data in below mentioned format.


To fix this error we need to provide XSLT Schema. Right click on solution explorer and select add new item, from new dialog box that opens, select XSLT file.

Now we need to provide XML template in this XSLT file which should look like mentioned below.


HTML Source of GridView
<asp:GridView ID="GridView1" runat="server" 
              AutoGenerateColumns="False" 
              DataSourceID="XmlDataSource1">
<Columns>
<asp:BoundField DataField="FirstName" HeaderText="FirstName" 
                SortExpression="FirstName" />
<asp:BoundField DataField="LastName" HeaderText="LastName" 
                SortExpression="LastName" />
<asp:BoundField DataField="Location" HeaderText="Location" 
                SortExpression="Location" />
</Columns>
</asp:GridView>

<asp:XmlDataSource ID="XmlDataSource1" runat="server" 
                 DataFile="~/App_Data/XMLFile.xml" 
                 TransformFile="~/App_Data/XSLTFile.xslt">
</asp:XmlDataSource>

Build and run the application.

Download Sample Code


0

Add Controls Dynamically WinForms WindowsFroms C# VB.NET

In this post i'm explaining how to Add Controls Dynamically In Winforms Windows Forms Application Using C# And VB.NET

I have used northwind database and Employees table to populate combobox and dataGridView.

Place two buttons on the form to add combobox and datagridview on button click and write below mentioned code in click event of each button respectively.

Add Controls Dynamically in Winforms Windows Forms


C#
private void btnDropDown_Click(object sender, EventArgs e)
        {
            int x = 13, y = 70;
            ComboBox cmbDynamic = new ComboBox();
            cmbDynamic.Location = new System.Drawing.Point(x, y);
            cmbDynamic.Name = "cmbDyn";
            cmbDynamic.DisplayMember = "FirstName";
            cmbDynamic.ValueMember = "EmployeeID";
            cmbDynamic.DataSource = employeesBindingSource;
            Controls.Add(cmbDynamic);
            
            
        }

Here X and Y co-ordinates are used to define at which location the control needs to be placed.

private void btnDataGrid_Click(object sender, EventArgs e)
        {
            int x = 13, y = 100;
            DataGridView gvDynamic = new DataGridView();
            gvDynamic.Location = new System.Drawing.Point(x, y);
            gvDynamic.Name = "gvDyn";
            gvDynamic.Width = 250;
            gvDynamic.Height = 260;
            gvDynamic.DataSource = employeesBindingSource;
            Controls.Add(gvDynamic);
        }

VB.NET
Private Sub btnDropDown_Click(sender As Object, e As EventArgs)
 Dim x As Integer = 13, y As Integer = 70
 Dim cmbDynamic As New ComboBox()
 cmbDynamic.Location = New System.Drawing.Point(x, y)
 cmbDynamic.Name = "cmbDyn"
 cmbDynamic.DisplayMember = "FirstName"
 cmbDynamic.ValueMember = "EmployeeID"
 cmbDynamic.DataSource = employeesBindingSource
 Controls.Add(cmbDynamic)


End Sub

Private Sub btnDataGrid_Click(sender As Object, e As EventArgs)
 Dim x As Integer = 13, y As Integer = 100
 Dim gvDynamic As New DataGridView()
 gvDynamic.Location = New System.Drawing.Point(x, y)
 gvDynamic.Name = "gvDyn"
 gvDynamic.Width = 250
 gvDynamic.Height = 260
 gvDynamic.DataSource = employeesBindingSource
 Controls.Add(gvDynamic)
End Sub


Build and run the code.

Find More Articles