This post explains How To Create Custom Login Page In SharePoint 2010 For Forms Based Authentication FBA.
Open Visual Studio 2010 and click on File > New Project
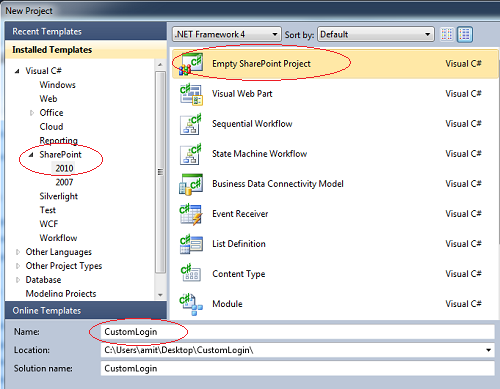
Select SharePoint 2010 from installed templates in left pane and select Empty SharePoint Project
Name this project CustomLogin
In the next window of SharePoint Customization Wizard, select the sharepoint site you want to create custom login page for and click on validate to test the connection.
Select Deploy as farm solution option and click on finish
Right click on project name in solution explorer and add new item
Select Application Page and name it Login.aspx
Before going to next step we need to add reference to IdentityModel dll to use it
Right click on Refrences and select add new reference
Click on Browse tab
Navigate to C:\Windows\assembly\GAC_MSIL\Microsoft.SharePoint.IdentityModel\14.0.0.0__71e9bce111e9429c
Select Microsoft.SharePoint.IdentityModel.dll and click on ok to add it's reference
Delete DynamicMasterPageFile="~masterurl/default.master" attribute from page directive in html source of page since we won't use master page for login page
It should look like shown below
Make sure html source of page have all the following assembly references and directives
Select your site and click on Authentication Providers from ribbon bar at top
Click on default zone and scroll to Sign In Page URL section
Select Custom Sign In Page option and provide the url to the Login page we just created and deployed
It should be ~/_layouts/CustomLogin/Login.aspx
Click on save and open the SharePoint site to see new custom login page for Forms Based Authentication
Open Visual Studio 2010 and click on File > New Project
Select SharePoint 2010 from installed templates in left pane and select Empty SharePoint Project
Name this project CustomLogin
In the next window of SharePoint Customization Wizard, select the sharepoint site you want to create custom login page for and click on validate to test the connection.
Right click on project name in solution explorer and add new item
Select Application Page and name it Login.aspx
Before going to next step we need to add reference to IdentityModel dll to use it
Right click on Refrences and select add new reference
Click on Browse tab
Navigate to C:\Windows\assembly\GAC_MSIL\Microsoft.SharePoint.IdentityModel\14.0.0.0__71e9bce111e9429c
Select Microsoft.SharePoint.IdentityModel.dll and click on ok to add it's reference
Delete DynamicMasterPageFile="~masterurl/default.master" attribute from page directive in html source of page since we won't use master page for login page
It should look like shown below
<%@ Page Language="C#" AutoEventWireup="true" CodeBehind="Login.aspx.cs" Inherits="CustomLogin.Layouts.CustomLogin.Login"%>
Make sure html source of page have all the following assembly references and directives
Delete all the ContentPlaceHolder html source from the page and design your login page with html as mentioned below
<html>
<head id="Head1" runat="server">
<title>Login </title>
</head>
<body>
<form id="form1" runat="server">
<asp:Label ID="Name" runat="server" Text="UserName:"/>
<br/>
<asp:TextBox ID="txtUserName" runat="server" Height="22px"/>
<br />
<asp:Label ID="lblPwd" runat="server" Text="Password:"/>
<br/>
<asp:TextBox ID="txtPwd" runat="server" TextMode="Password"
Height="22px"/>
<br />
<asp:Button ID="btnLogIn" runat="server" Text="Sign In"
onclick="btnLogIn_Click"/>
<br /><br />
<asp:Label ID="lblMsg" runat="server" Text=""/>
</form>
</body>
</html>
I have placed two textbox on the page for username, password and one button for login
Change inharitance of Login class to System.Web.UI.Page (it might be LayoutsPageBase)
Write following code in Click event of button in code behind of page
using System;
using Microsoft.SharePoint;
using Microsoft.SharePoint.WebControls;
using Microsoft.SharePoint.IdentityModel;
using Microsoft.SharePoint.IdentityModel.Pages;
namespace CustomLogin.Layouts.CustomLogin
{
    public partial class Login : System.Web.UI.Page
    {
        protected void Page_Load(object sender, EventArgs e)
        {
        }

        protected void btnLogIn_Click(object sender, EventArgs e)
        {
            if ((txtUserName.Text.Length > 0 && txtPwd.Text.Length > 0))
            {
                bool authenticated = SPClaimsUtility.AuthenticateFormsUser(Context.Request.UrlReferrer, txtUserName.Text, txtPwd.Text);
                if (!authenticated)
                {
                    lblMsg.Text = "Invalid Username or Password";

                }
                else
                {
                    Response.Redirect(Context.Request.QueryString["ReturnUrl"].ToString());

                }

            }
            else
            {
                lblMsg.Text = "Username or Password can't be empty";
            }
        }

    }
}
Build the solution and then Select Deploy Solution from Build menu to deploy it.
It should create a CustomLogin folder inside _layouts folder in SharePoint site application in IIS Server
Open SharePoint Central Administration, Click on Manage Web Applications
Select your site and click on Authentication Providers from ribbon bar at top
Click on default zone and scroll to Sign In Page URL section
Select Custom Sign In Page option and provide the url to the Login page we just created and deployed
It should be ~/_layouts/CustomLogin/Login.aspx
Click on save and open the SharePoint site to see new custom login page for Forms Based Authentication
If you like this post than join us or share


0 comments:
Post a Comment