Add License Agreement In Setup Project Using Visual Studio For Winforms Windows Forms Or Asp.Net Web Applications

In this post i am explaining steps to add license agreement dialog in visual studio setup project.
After Creating Setup And Deployment Project in Visual Studio 2008/2010 follow instructions given below
First of all we need to create a licence agreement file, for this open wordpad and type your licence agreement text and save it as licence.rtf.
Add this file in your project in solution explorer by select add existing item menu.
Right click on your setup project and select View > File System.

Right click on Application folder and select Add > File.
Browse to licence.rtf we added to solution in step 1.

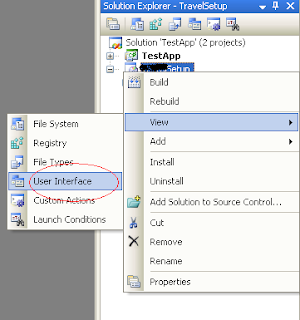
Right click on setup project in solution explorer and select View > User Interface.
Right click on Start and select Add Dialog.

Select Licence agreement and click on OK.

Move it Up by right clicking and selecting Move Up to put it on the top to show up when setup starts.
Select Licence Agreement dialog in start group and open it's property window by pressing F4 key.

Click on Browse in LicenceFile property and select licence.rtf file from Application Folder and click on OK.

Save and build the setup project and licence agreement dialog will launch when you run setup.exe (as shown below).


In this post i am explaining steps to add license agreement dialog in visual studio setup project.
After Creating Setup And Deployment Project in Visual Studio 2008/2010 follow instructions given below
step 1.
First of all we need to create a licence agreement file, for this open wordpad and type your licence agreement text and save it as licence.rtf.
Add this file in your project in solution explorer by select add existing item menu.
Step 2.
Right click on your setup project and select View > File System.

Step 3.
Right click on Application folder and select Add > File.
Browse to licence.rtf we added to solution in step 1.

Step 4.
Right click on setup project in solution explorer and select View > User Interface.

Step 5.
Right click on Start and select Add Dialog.

Select Licence agreement and click on OK.

Move it Up by right clicking and selecting Move Up to put it on the top to show up when setup starts.
Step 6.
Select Licence Agreement dialog in start group and open it's property window by pressing F4 key.

Click on Browse in LicenceFile property and select licence.rtf file from Application Folder and click on OK.

Save and build the setup project and licence agreement dialog will launch when you run setup.exe (as shown below).

If you like this post than join us or share

1 comments:
nice dude
Post a Comment