1

Validation Of ViewState MAC Failed Error Asp.Net

If you are receiving Validation Of ViewState MAC Failed Error In Asp.Net web application.

This occurs if you are using controls like Gridview or Detailsview with DataKeyNames on the page and page takes long time in loading.

This issue has been fixed in .Net framework 2.0 SP2 and .Net framework 3.5 SP1. so upgrading to service packs is best option to fix validation of viewstate mac failed error.

Other workarounds can be

1. Set enableEventValidation to false and viewStateEncryptionMode to Never in web.config.
   1:  <pages enableeventvalidation="false" 
   2:         viewstateencryptionmode="Never">


5

Custom Login Web Part In SharePoint 2010 Forms Based

This post explains How To Create Custom Login Web Part In SharePoint 2010 For Forms Based Authentication FBA.

Before creating Login WebPart we need to setup and configure Membership Provider Database and Forms Based Authentication(FBA) In SharePoint 2010 and can optionally Allow Anonymous Access to sharepoint web application and sites collection.

1. Create Visual Web Part In Visual Studio 2010
Open VS 2010 and create new project by selecting New > Project from File Menu

Create Custom Login WebPart In SharePoint 2010 For Forms Based Authentication FBA


Choose SharePoint 2010 in left pane and select Empty SharePoint Project, name it LoginWebPart.

Select Deploy as a farm solution option from next screen and click on finish

Right click on solution explorer and select Add > New Item

Visual Web Part For Login In SharePoint 2010


Choose Visual Web Part from the list and name it LoginWebPart

2. Add Reference To Assemblies
2a. Add reference to Microsoft.SharePoint.IdentityModel.dll
Right click on Refrences in solution explorer, select add reference and browse to
C:\Windows\assembly\GAC_MSIL\Microsoft.SharePoint.IdentityModel\14.0.0.0__71e9bce111e9429c\Microsoft.SharePoint.IdentityModel.dll 

2b. Add reference to Microsoft.IdentityModel.dll
Select add reference and browse to
C:\Program Files\Reference Assemblies\Microsoft\Windows Identity Foundation\v3.5\Microsoft.IdentityModel.dll

2c. Add reference toSystem.IdentityModel.dll
Browse to C:\Program Files (x86)\Reference Assemblies\Microsoft\Framework\v3.0\System.IdentityModel.dll

2d. Add Microsoft.SharePoint.IdentityModel assembly reference in Page Directive of LoginWebPartUserControl.ascx

Assembly reference to Microsoft.IdentityModel.dll


3. Place Login Control on the LoginWebPartUserControl

HTML SOURCE
<%@ Assembly Name="$SharePoint.Project.AssemblyFullName$" %>
 
<%@ Assembly Name="Microsoft.SharePoint.IdentityModel, Version=14.0.0.0, Culture=neutral, PublicKeyToken=71e9bce111e9429c" %>
 
<%@ Assembly Name="Microsoft.Web.CommandUI, Version=14.0.0.0, Culture=neutral, PublicKeyToken=71e9bce111e9429c" %> 
 
<%@ Register Tagprefix="SharePoint" Namespace="Microsoft.SharePoint.WebControls" 
             Assembly="Microsoft.SharePoint, Version=14.0.0.0, Culture=neutral, PublicKeyToken=71e9bce111e9429c" %> 
 
<%@ Register Tagprefix="Utilities" Namespace="Microsoft.SharePoint.Utilities" 
             Assembly="Microsoft.SharePoint, Version=14.0.0.0, Culture=neutral, PublicKeyToken=71e9bce111e9429c" %>
 
<%@ Register Tagprefix="asp" Namespace="System.Web.UI" 
             Assembly="System.Web.Extensions, Version=3.5.0.0, Culture=neutral, PublicKeyToken=31bf3856ad364e35" %>
 
<%@ Import Namespace="Microsoft.SharePoint" %> 
 
<%@ Register Tagprefix="WebPartPages" Namespace="Microsoft.SharePoint.WebPartPages" 
             Assembly="Microsoft.SharePoint, Version=14.0.0.0, Culture=neutral, PublicKeyToken=71e9bce111e9429c" %>
 
<%@ Control Language="C#" AutoEventWireup="true" CodeBehind="LoginWebPartUserControl.ascx.cs" 
            Inherits="LoginWebPart.LoginWebPart.LoginWebPartUserControl" %>
 
 
<asp:Login ID="Login1" runat="server" 
           FailureText="<%$ Resources:wss,login_pageFailureText %>" 
           onauthenticate="Login1_Authenticate">
</asp:Login>


4. Go to Code behind of user control and add following reference
using System;
using System.Web.UI;
using System.Web.UI.WebControls;
using Microsoft.SharePoint.IdentityModel;
using Microsoft.SharePoint;
using Microsoft.SharePoint.Utilities;
using System.IdentityModel.Tokens;


Write following code in Login1_Authenticate Event of Login Control

protected void Login1_Authenticate(object sender, AuthenticateEventArgs e)
        {
            string membership = "MembershipProvider";
            string role = "RoleProvider";

            e.Authenticated = SPClaimsUtility.AuthenticateFormsUser(new Uri(SPContext.Current.Web.Url),Login1.UserName,Login1.Password);

            if (!e.Authenticated) return;

            SecurityToken token = SPSecurityContext.SecurityTokenForFormsAuthentication(new Uri(SPContext.Current.Web.Url), membership, role, Login1.UserName, Login1.Password);
            if (token == null)
            {

                e.Authenticated = false;
                return;
            }
            else
            {

                SPFederationAuthenticationModule module = SPFederationAuthenticationModule.Current;
                module.SetPrincipalAndWriteSessionToken(token);
                e.Authenticated = true;

                SPUtility.Redirect(SPContext.Current.Web.Url, SPRedirectFlags.Trusted, this.Context);

            }
        }


Build and Deploy Solution by clicking on Build Menu and select Deploy Solution From Visual Studio

5. Open SharePoint site in browser and login with administrator account

Click on Site Actions and Select Edit Page


Click on Insert and select Web Part from the top ribbon


Select Custom from Categories And select LoginWebPart, Click on Add and Save And Close


Hope this helps

7

Asp.Net AjaxFileUpload Control With Drag Drop And Progress Bar

This Example explains how to use AjaxFileUpload Control With Drag Drop And Progress Bar Functionality In Asp.Net 2.0 3.5 4.0 C# And VB.NET.

May 2012 release of AjaxControlToolkit includes a new AjaxFileUpload Control which supports Multiple File Upload, Progress Bar and Drag And Drop functionality.

These new features are supported by Google Chrome version 16+, Firefox 8+ , Safari 5+ and Internet explorer 10 + , IE9 or earlier does not support this feature.

AjaxFileUpload Control Example with Drag Drop And Progress Bar

To start with it, download and put latest AjaxControlToolkit.dll in Bin folder of application, Place ToolkitScriptManager and AjaxFileUpload on the page.

HTML SOURCE
<asp:ToolkitScriptManager ID="ToolkitScriptManager1" runat="server"/>
          
<asp:AjaxFileUpload ID="AjaxFileUpload1" runat="server" 
                    OnUploadComplete="UploadComplete" 
                    ThrobberID="loader"/>
 
<asp:Image ID="loader" runat="server" 
           ImageUrl ="~/loading.gif" Style="display:None"/>


ThrobberID is used to display loading image instead of progress bar in unsupported browsers.

Type of files uploaded can be restricted by using AllowedFileTypes property with comma separated list such as "zip,doc,pdf".

Write following code in OnUploadComplete event to save the file.

C#
protected void UploadComplete(object sender, AjaxControlToolkit.AjaxFileUploadEventArgs e)
    {
        string path = Server.MapPath("~/Uploads/") + e.FileName;
        AjaxFileUpload1.SaveAs(path);
    }
VB.NET
protected void UploadComplete(object sender, AjaxControlToolkit.AjaxFileUploadEventArgs e)
    {
        string path = Server.MapPath("~/Uploads/") + e.FileName;
        AjaxFileUpload1.SaveAs(path);
    }
Build and run the code.

Download Sample Code


0

Ajax ConfirmButtonExtender With ModalPopUp In GridView Asp.Net

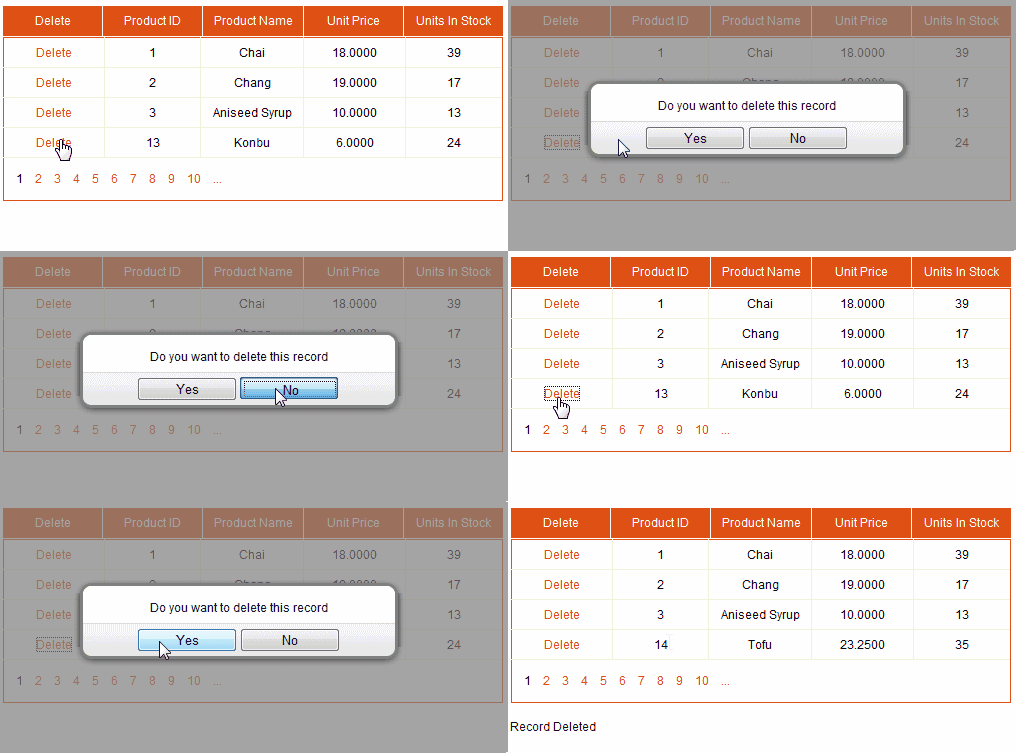
This example implements Ajax ConfirmButtonExtender With ModalPopUp Extender In Asp.Net GridView to show Delete Confirmation before deleting records.

Populate GridView using SqlDataSource and add one LinkButton inside TemplateField in Columns.

   1:  <asp:TemplateField HeaderText="Delete">
   2:  <ItemTemplate>
   3:  <asp:LinkButton ID="lnkDel" runat="server" 
   4:                  CommandName="Delete" Text="Delete"/>


Place ToolkitScriptManager and UpdatePanel on the page and add ConfirmButton, ModalPopUpExtender and Panel to pop inside Template field we added earlier.

HTML SOURCE
<div>
<asp:ToolkitScriptManager ID="ToolkitScriptManager1" runat="server"/>
<asp:UpdatePanel ID="UpdatePanel1" runat="server">
<ContentTemplate>
        
<asp:GridView ID="GridView1" runat="server" 
              AutoGenerateColumns="False" 
              DataKeyNames="ProductID" 
              DataSourceID="SqlDataSource1"
              onrowdeleted="GridView1_RowDeleted">
<Columns>
<asp:TemplateField HeaderText="Delete">
<ItemTemplate>
<asp:LinkButton ID="lnkDel" runat="server" 
                CommandName="Delete" Text="Delete"/>
                
<asp:ConfirmButtonExtender ID="ConfirmButtonExtender1" 
                           runat="server" 
                           TargetControlID="lnkDel"
                           DisplayModalPopupID="ModalPopupExtender1"/>
                                        
<asp:ModalPopupExtender ID="ModalPopupExtender1" 
                        runat="server"
                        TargetControlID="lnkDel"
                        PopupControlID="pnlModal"
                        BackgroundCssClass="Background"
                        OkControlID="btnYes"
                        CancelControlID="btnNo"
                        X="80"
                        Y="80"/>
 
<asp:Panel runat="Server" ID="pnlModal" CssClass="Pnl">
<br />         
Do you want to delete this record
<br /><br />
<asp:Button ID="btnYes" runat="server" Text="Yes"/>
<asp:Button ID="btnNo" runat="server" Text="No"/>
</asp:Panel>
</ItemTemplate>
</asp:TemplateField>
 
<asp:BoundField DataField="ProductID" HeaderText="ProductID"/>
<asp:BoundField DataField="ProductName" HeaderText="ProductName"/> 
<asp:BoundField DataField="UnitPrice" HeaderText="UnitPrice"/> 
<asp:BoundField DataField="UnitsInStock" HeaderText="UnitsInStock"/> 
</Columns>
</asp:GridView>
 
<asp:Label ID="lblMessage" runat="server" Text=""/>
</ContentTemplate>
</asp:UpdatePanel>
 
<asp:SqlDataSource ID="SqlDataSource1" runat="server" 
ConnectionString="<%$ ConnectionStrings:NorthwindConnectionString %>" 
DeleteCommand="DELETE FROM [Products] 
               WHERE [ProductID] = @ProductID" 
SelectCommand="SELECT [ProductID], [ProductName], 
              [UnitPrice], [UnitsInStock] FROM [Products]" 
        
<DeleteParameters>
<asp:Parameter Name="ProductID" Type="Int32" />
</DeleteParameters>
</asp:SqlDataSource>
</div>


Add following CSS style in Head section of the page.
  

Build and run the code

AJax ConfirmButtonExtender With ModalPopUp In GridView Asp.Net

Download Sample Code


1

Populate Bind DropDownList From XML File In Asp.Net

This Example explains how to Populate Or Bind DropDownList With XML File Data In Asp.Net In 3/n Tier Architecture Using C# And VB.

Populate Bind DropDownList From XML File
Place one DropdownList on the page.

<asp:DropDownList ID="DropDownList1" 
                  runat="server" 
                  onselectedindexchanged
  ="DropDownList1_SelectedIndexChanged">


XML Data Can be in various formats, i'll use 3 different ones shown below.


Sample 1.
   1:  <?xml version="1.0" encoding="utf-8" ?>
   2:  <Employees>
   3:    <Detail>
   4:      <ID>1</ID>
   5:      <Name>Csharp</Name>
   6:    </Detail>
   7:    <Detail>
   8:      <ID>2</ID>
   9:      <Name>AspNet</Name>
  10:    </Detail>
  11:    <Detail>
  12:      <ID>3</ID>
  13:      <Name>Articles</Name>
  14:    </Detail>
  15:  </Employees>

Another format can be
   1:  <?xml version="1.0" encoding="utf-8" ?>
   2:  <Employees>
   3:    <Detail ID="1" Name="Csharp"></Detail>
   4:    <Detail ID="2" Name="AspNet"></Detail>
   5:    <Detail ID="3" Name="Articles"></Detail>
   6:  </Employees>

Writing following code in Page_Load event is enough to bind dropdownlist from these types of XML data.

C#
using System.Data;
using System.Xml;
protected void Page_Load(object sender, EventArgs e)
{
        DataSet dsXml = new DataSet();
        dsXml.ReadXml(Server.MapPath("~/XMLFile2.xml"));
        DropDownList1.DataSource = dsXml;
        DropDownList1.DataTextField = "Name";
        DropDownList1.DataValueField = "ID";
        DropDownList1.DataBind();
        DropDownList1.AutoPostBack = true;
}

VB.NET
Protected Sub Page_Load(sender As Object, e As EventArgs)
 Dim dsXml As New DataSet()
 dsXml.ReadXml(Server.MapPath("~/XMLFile2.xml"))
 DropDownList1.DataSource = dsXml
 DropDownList1.DataTextField = "Name"
 DropDownList1.DataValueField = "ID"
 DropDownList1.DataBind()
 DropDownList1.AutoPostBack = True
End Sub


If XML format is mix of above two.
   1:  <?xml version="1.0" encoding="utf-8" ?>
   2:  <Details>
   3:    <Name ID="1">Amit</Name>
   4:    <Name ID="2">Jain</Name>
   5:    <Name ID="3">Csharp</Name>
   6:    <Name ID="4">AspNet</Name>
   7:    <Name ID="5">Articles</Name>
   8:  </Details>

We need to loop through nodes to fine value of ID attribute.

C#
protected void Page_Load(object sender, EventArgs e)
    {
        if (!IsPostBack)
        {
            XmlDocument doc = new XmlDocument();
            doc.Load(Server.MapPath("~/XMLFile.xml"));
            XmlNodeList list = doc.GetElementsByTagName("Name");
            foreach (XmlNode node in list)
            {
                ListItem lItem = new ListItem(node.InnerText, node.Attributes["ID"].Value);
                DropDownList1.Items.Add(lItem);
            }
            DropDownList1.Items.Insert(0, "--Select--");
            DropDownList1.SelectedIndex = 0;
            DropDownList1.AutoPostBack = true;
        }
    }

VB
Protected Sub Page_Load(sender As Object, e As EventArgs)
 If Not IsPostBack Then
  Dim doc As New XmlDocument()
  doc.Load(Server.MapPath("~/XMLFile.xml"))
  Dim list As XmlNodeList = doc.GetElementsByTagName("Name")
  For Each node As XmlNode In list
   Dim lItem As New ListItem(node.InnerText, node.Attributes("ID").Value)
   DropDownList1.Items.Add(lItem)
  Next
  DropDownList1.Items.Insert(0, "--Select--")
  DropDownList1.SelectedIndex = 0
  DropDownList1.AutoPostBack = True
 End If
End Sub


To Bind DropDownList in 3 tier architecture environment, add to new class files in App_Code folder of application and name them DataLayer.cs and BusinessLayer.cs

Write Following code in these class respectively.

Data Access Layer (DAL)
using System.Web;
using System.Xml;
public class DataLayer
{
 public DataLayer()
 {
 }
    public XmlDocument GetXmlData()
    {
        XmlDocument doc = new XmlDocument();
        doc.Load(HttpContext.Current.Server.MapPath("~/XMLFile.xml"));
        return doc;
    }
}

Business Access Layer (BAL)
using System.Web.UI.WebControls;
using System.Xml;
public class BusinessLayer
{
 public BusinessLayer()
 {
    }
    public ListItemCollection BindDropDownList()
    {
        ListItemCollection ddlItems = new ListItemCollection();
        DataLayer objDAL = new DataLayer();
        XmlNodeList list = objDAL.GetXmlData().GetElementsByTagName("Name");
        foreach (XmlNode node in list)
        {
           ListItem item = new ListItem(node.InnerText, node.Attributes["ID"].Value);
           ddlItems.Add(item);
            
        }
        return ddlItems;
    }
}

Write code in Page_Load event of aspx page (Presentation Layer)
protected void Page_Load(object sender, EventArgs e)
    {
        if (!IsPostBack)
        {
            BusinessLayer objBAL = new BusinessLayer();
            DropDownList1.DataSource = objBAL.BindDropDownList();
            DropDownList1.DataBind();
            DropDownList1.Items.Insert(0, "--Select--");
            DropDownList1.SelectedIndex = 0;
            DropDownList1.AutoPostBack = true;
        }
    }


2

Auto Refresh Update GridView In Asp.Net Ajax With Timer

This Example describes How To Auto Refresh Or Update GridView Automatically At Regular Interval In Asp.Net Using Ajax And Timer.

Add GridView And Timer control inside UpdatePanel on the page and set Interval property to desired value in miliseconds. I have set it to 5000 (5 Seconds).

HTML SOURCE
   1:  <asp:ScriptManager ID="ScriptManager1" runat="server"/>
   2:  <asp:UpdatePanel ID="UpdatePanel1" runat="server">
   3:  <ContentTemplate>
   4:   
   5:  <asp:Timer ID="AutoRefreshTimer" runat="server" 
   6:             Interval="5000" 
   7:             ontick="AutoRefreshTimer_Tick"/>
   8:                              
   9:  <asp:GridView ID="GridView1" runat="server" 
  10:                AutoGenerateColumns="False" 
  11:                DataSourceID="SqlDataSource1">
  12:  <Columns>
  13:  <asp:BoundField DataField="FirstName" HeaderText="FirstName"/>
  14:  <asp:BoundField DataField="LastName" HeaderText="LastName"/>
  15:  <asp:BoundField DataField="Location" HeaderText="Location"/>
  16:  </Columns>
  17:  </asp:GridView>
  18:   
  19:  <asp:SqlDataSource ID="SqlDataSource1" runat="server" 
  20:  ConnectionString="<%$ ConnectionStrings:ConnectionString %>" 
  21:  SelectCommand="SELECT [FirstName], [LastName], [Location] 
  22:                 FROM [Details]">
  23:  </asp:SqlDataSource>
  24:   
  25:  <asp:Label ID="lblMsg" runat="server"/>
  26:  </ContentTemplate>
  27:  </asp:UpdatePanel>


Rebind GridView In Tick Event of Timer to refresh.

C#
protected void AutoRefreshTimer_Tick(object sender, EventArgs e)
    {
        GridView1.DataBind();
        lblMsg.Text = "Last Updated at " + DateTime.Now;
    }


Image below shows the implementation.

Automatically Refresh Update Asp.Net GridView with Ajax Timer

Hope this helps.

0

SharePoint 2010 Custom Login Page For FBA

This post explains How To Create Custom Login Page In SharePoint 2010 For Forms Based Authentication FBA.

Open Visual Studio 2010 and click on File > New Project


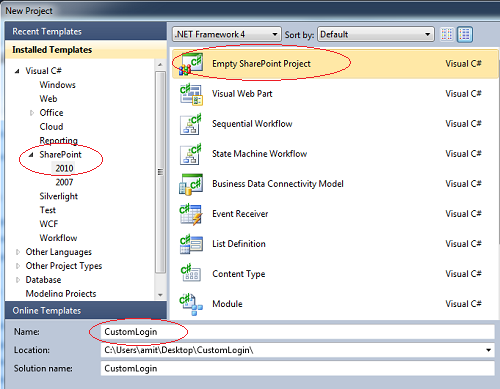
Select SharePoint 2010 from installed templates in left pane and select Empty SharePoint Project 

SharePoint 2010 Custom Login Page FBA

Name this project CustomLogin 


In the next window of SharePoint Customization Wizard, select the sharepoint site you want to create custom login page for and click on validate to test the connection.

Forms Based Authentication SharePoint


Select Deploy as farm solution option and click on finish


Right click on project name in solution explorer and add new item

Login Page

Select Application Page and name it Login.aspx

Before going to next step we need to add reference to IdentityModel dll to use it

Right click on Refrences and select add new reference
Click on Browse tab
Navigate to C:\Windows\assembly\GAC_MSIL\Microsoft.SharePoint.IdentityModel\14.0.0.0__71e9bce111e9429c

Microsoft.SharePoint.IdentityModel.dll

Select Microsoft.SharePoint.IdentityModel.dll and click on ok to add it's reference


Delete DynamicMasterPageFile="~masterurl/default.master" attribute from page directive in html source of page since we won't use master page for login page

It should look like shown below

<%@ Page Language="C#" AutoEventWireup="true" CodeBehind="Login.aspx.cs" Inherits="CustomLogin.Layouts.CustomLogin.Login"%>


Make sure html source of page have all the following assembly references and directives


Delete all the ContentPlaceHolder html source from the page and design your login page with html as mentioned below 
<html>
<head id="Head1" runat="server">
 <title>Login </title>
 </head>
<body>
<form id="form1" runat="server">
 
<asp:Label ID="Name" runat="server" Text="UserName:"/>
<br/>
<asp:TextBox ID="txtUserName" runat="server" Height="22px"/>
<br />
<asp:Label ID="lblPwd" runat="server" Text="Password:"/>
<br/>
<asp:TextBox ID="txtPwd" runat="server" TextMode="Password" 
                                        Height="22px"/>
<br />
 
<asp:Button ID="btnLogIn" runat="server" Text="Sign In" 
                          onclick="btnLogIn_Click"/>
                    
<br /><br />
<asp:Label ID="lblMsg" runat="server" Text=""/>
</form>
</body>
</html>


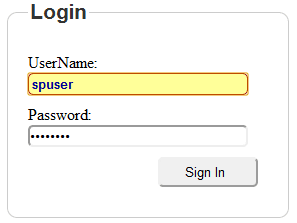
I have placed two textbox on the page for username, password and one button for login

Change inharitance of Login class to System.Web.UI.Page  (it might be LayoutsPageBase)


Write following code in Click event of button in code behind of page 


using System;
using Microsoft.SharePoint;
using Microsoft.SharePoint.WebControls;
using Microsoft.SharePoint.IdentityModel;
using Microsoft.SharePoint.IdentityModel.Pages;
namespace CustomLogin.Layouts.CustomLogin
{
    public partial class Login : System.Web.UI.Page
    {
        protected void Page_Load(object sender, EventArgs e)
        {
        }

        protected void btnLogIn_Click(object sender, EventArgs e)
        {
            if ((txtUserName.Text.Length > 0 && txtPwd.Text.Length > 0))
            {
                bool authenticated = SPClaimsUtility.AuthenticateFormsUser(Context.Request.UrlReferrer, txtUserName.Text, txtPwd.Text);
                if (!authenticated) 
                {
                    lblMsg.Text = "Invalid Username or Password";

                }
                else 
                {
                    Response.Redirect(Context.Request.QueryString["ReturnUrl"].ToString());

                }

            }
            else
            {
                lblMsg.Text = "Username or Password can't be empty";
            }
        }

    }
}
Build the solution and then Select Deploy Solution from Build menu to deploy it.

Deploy SharePoint SIte


It should create a CustomLogin folder inside _layouts folder in SharePoint site application in IIS Server 

Open SharePoint Central Administration, Click on Manage Web Applications


Select your site and click on Authentication Providers from ribbon bar at top


Click on default zone and scroll to Sign In Page URL section


Select Custom Sign In Page option and provide the url to the Login page we just created and deployed
It should be ~/_layouts/CustomLogin/Login.aspx

Click on save and open the SharePoint site to see new custom login page for Forms Based Authentication


0

Select GridView Row Without Postback OnClick Of Cell JavaScript

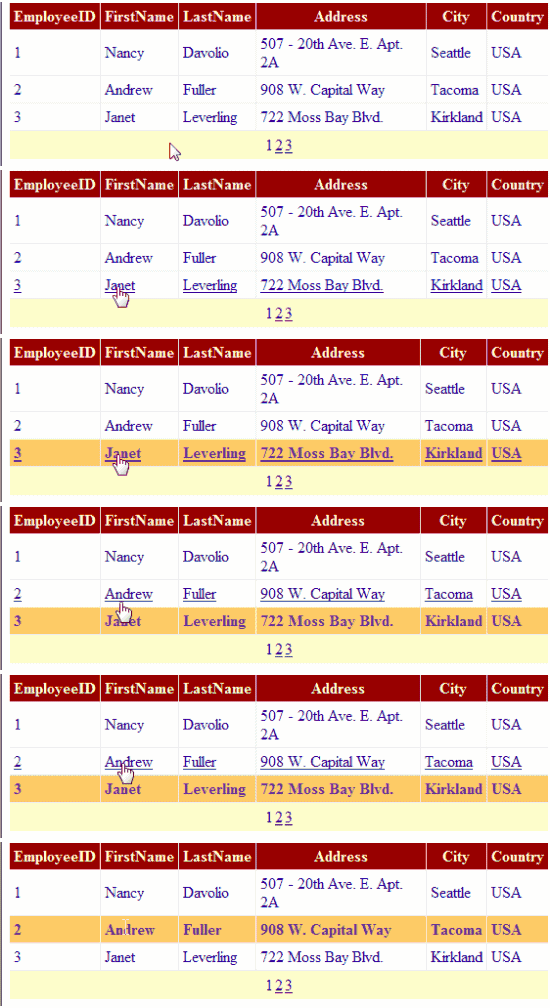
This Example explains how to Select GridView Row On Click Of Cell Programmatically Without Postback Using JavaScript In Asp.Net.

We can make cells clickable by adding OnClick attribute in ClientScript.

Place ScriptManager And UpdatePanel on the page and add Gridview inside ContentTemaplate for partial postbacks, Populate it using SqlDataSource.


HTML SOURCE OF GRIDVIEW
   1:  <asp:ScriptManager ID="ScriptManager1" runat="server"/>
   2:  <asp:UpdatePanel ID="UpdatePanel1" runat="server">
   3:  <ContentTemplate>
   4:   
   5:  <asp:GridView ID="GridView1" runat="server" 
   6:                AutoGenerateColumns="False" 
   7:                DataKeyNames="EmployeeID" 
   8:                DataSourceID="SqlDataSource1" 
   9:                onrowdatabound="GridView1_RowDataBound" 
  10:                AllowPaging="True"    
  11:                onpageindexchanging="GridView1_PageIndexChanging">
  12:  <Columns>
  13:  <asp:BoundField DataField="EmployeeID" HeaderText="EmployeeID"/>
  14:  <asp:BoundField DataField="FirstName" HeaderText="FirstName"/>
  15:  <asp:BoundField DataField="City" HeaderText="City"/>
  16:  <asp:BoundField DataField="Country" HeaderText="Country"/>
  17:  </Columns>
  18:  </asp:GridView>
  19:   
  20:  <asp:SqlDataSource ID="SqlDataSource1" runat="server" 
  21:  ConnectionString="<%$ ConnectionStrings:ConnectionString %>" 
  22:  SelectCommand="SELECT [EmployeeID], [FirstName], [City], 
  23:                [Country] FROM [Employees]">
  24:  </asp:SqlDataSource>
  25:  </ContentTemplate>
  26:  </asp:UpdatePanel>

Write code mentioned below in RowDataBound Event.

C#
protected void GridView1_RowDataBound(object sender, GridViewRowEventArgs e)
    {
        if (e.Row.RowType == DataControlRowType.DataRow)
        {
            e.Row.Attributes["onmouseover"] = "this.style.cursor='hand';";
            e.Row.Attributes["onmouseout"] = "this.style.textDecoration='none';";

            e.Row.Attributes["onclick"] = ClientScript.GetPostBackClientHyperlink(this.GridView1, "Select$" + e.Row.RowIndex);
        }
    }

protected void GridView1_PageIndexChanging(object sender, GridViewPageEventArgs e)
    {
        GridView1.SelectedIndex = -1;
    }

VB.NET
Protected Sub GridView1_RowDataBound(sender As Object, e As GridViewRowEventArgs)
 If e.Row.RowType = DataControlRowType.DataRow Then
  e.Row.Attributes("onmouseover") = "this.style.cursor='hand';"
  e.Row.Attributes("onmouseout") = "this.style.textDecoration='none';"

  e.Row.Attributes("onclick") = ClientScript.GetPostBackClientHyperlink(Me.GridView1, "Select$" & Convert.ToString(e.Row.RowIndex))
 End If
End Sub

Protected Sub GridView1_PageIndexChanging(sender As Object, e As GridViewPageEventArgs)
 GridView1.SelectedIndex = -1
End Sub

While running this code we get EventValidation error.

Invalid postback or callback argument. Event validation is enabled using in configuration or <%@ Page EnableEventValidation="true" %> in a page. For security purposes, this feature verifies that arguments to postback or callback events originate from the server control that originally rendered them. If the data is valid and expected, use the ClientScriptManager.RegisterForEventValidation method in order to register the postback or callback data for validation.

We can fix this by setting EnableEventValidation="false" in page directive but it will be a security risk, so there are other ways to handle this.

Method 1.
Add this style in head section of page
   1:  <style>
   2:  .visibility {Display : none}
   3:  </style>

Now add ShowSelectButton Commandfield column in gridview source and set it's css property to style we added in head. this will hide the select button.
   1:  <asp:CommandField ShowSelectButton="True" 
   2:                    ItemStyle-CssClass="visibility"/>


Method 2.
Remove the code from RowDataBound Event of GridView and OverRide Render event of page, set the last parameter (bool registerForEventValidation) of ClientScript to true.

C#
protected override void Render(System.Web.UI.HtmlTextWriter textWriter)
    {
        foreach (GridViewRow gvRow in GridView1.Rows)
        {
            if (gvRow.RowType == DataControlRowType.DataRow)
            {
                gvRow.Attributes["onmouseover"] =
                   "this.style.cursor='hand';";
                gvRow.Attributes["onmouseout"] =
                   "this.style.textDecoration='none';";
                gvRow.Attributes["onclick"] =
                 ClientScript.GetPostBackClientHyperlink(GridView1, "Select$" + gvRow.RowIndex, true);
            }
        }
        base.Render(textWriter);
    }

VB
Protected Overrides Sub Render(textWriter As System.Web.UI.HtmlTextWriter)
 For Each gvRow As GridViewRow In GridView1.Rows
  If gvRow.RowType = DataControlRowType.DataRow Then
   gvRow.Attributes("onmouseover") = "this.style.cursor='hand';"
   gvRow.Attributes("onmouseout") = "this.style.textDecoration='none';"
   gvRow.Attributes("onclick") = ClientScript.GetPostBackClientHyperlink(GridView1, "Select$" + gvRow.RowIndex, True)
  End If
 Next
 MyBase.Render(textWriter)
End Sub

Select GridView Row On Cell Click

Hope this helps.

Find More Articles