Showing posts with label WinForms. Show all posts
2

Cascading ComboBox In Winforms Windows Forms C# VB.NET

This example explains How To Create Cascading ComboBox Dependent On One Another In WinForms Windows Forms Applications Using C# And VB.Net.


I have used Country, State, City tables from database to populate respective cascading combobox based on selection of country and state.


Drag 3 combobox controls from toolbar on the windows form, write following code to populate comboboxes.

Table schemas are shown below.

Cascading Combobox In Winforms Windows Forms C# VB


Write connection string in app.config file
<configuration>
<connectionStrings>
<add name="connectionString"
     connectionString="Data Source=.\SQLEXPRESS;AttachDbFilename=|DataDirectory|\Cascading.mdf;Integrated Security=True;User Instance=True"
     providerName="System.Data.SqlClient" />
</connectionStrings>
</configuration>


Bind Country ComboBox when Form loads
using System;
using System.Data;
using System.Windows.Forms;
using System.Configuration;
using System.Data.SqlClient;

namespace CascadingComboBox
{
    public partial class Form1 : Form
    {
        string strConn = ConfigurationManager.ConnectionStrings["connectionString"].ConnectionString;
        public Form1()
        {
            InitializeComponent();
        }

        private void Form1_Load(object sender, EventArgs e)
        {
            FillCountry();
        }
        private void FillCountry()
        {
            SqlConnection con = new SqlConnection(strConn);
            SqlCommand cmd = new SqlCommand();
            cmd.Connection = con;
            cmd.CommandType = CommandType.Text;
            cmd.CommandText = "SELECT CountryID, CountryName FROM Country";
            DataSet objDs = new DataSet();
            SqlDataAdapter dAdapter = new SqlDataAdapter();
            dAdapter.SelectCommand = cmd;
            con.Open();
            dAdapter.Fill(objDs);
            con.Close();
            cmbCountry.ValueMember = "CountryID";
            cmbCountry.DisplayMember = "CountryName";
            cmbCountry.DataSource = objDs.Tables[0];
        }
    }
}


Populate State and City combobox in SelectedIndexChanged event of country,State combobox based on selected IDs
private void cmbCountry_SelectedIndexChanged(object sender, EventArgs e)
        {
            if (cmbCountry.SelectedValue.ToString() != "")
            {
                int CountryID = Convert.ToInt32(cmbCountry.SelectedValue.ToString());
                FillStates(CountryID);
                cmbCity.SelectedIndex = 0;
            }
        }

        private void FillStates(int countryID)
        {
            SqlConnection con = new SqlConnection(strConn);
            SqlCommand cmd = new SqlCommand();
            cmd.Connection = con;
            cmd.CommandType = CommandType.Text;
            cmd.CommandText = "SELECT StateID, StateName FROM State WHERE CountryID =@CountryID";
            cmd.Parameters.AddWithValue("@CountryID", countryID);
            DataSet objDs = new DataSet();
            SqlDataAdapter dAdapter = new SqlDataAdapter();
            dAdapter.SelectCommand = cmd;
            con.Open();
            dAdapter.Fill(objDs);
            con.Close();
            if (objDs.Tables[0].Rows.Count > 0)
            {
                cmbState.ValueMember = "StateID";
                cmbState.DisplayMember = "StateName";
                cmbState.DataSource = objDs.Tables[0];
            }
            
        }

        private void cmbState_SelectedIndexChanged(object sender, EventArgs e)
        {
            int StateID = Convert.ToInt32(cmbState.SelectedValue.ToString());
            FillCities(StateID);
        }

        private void FillCities(int stateID)
        {
            SqlConnection con = new SqlConnection(strConn);
            SqlCommand cmd = new SqlCommand();
            cmd.Connection = con;
            cmd.CommandType = CommandType.Text;
            cmd.CommandText = "SELECT CityID, CityName FROM City WHERE StateID =@StateID";
            cmd.Parameters.AddWithValue("@StateID", stateID);
            DataSet objDs = new DataSet();
            SqlDataAdapter dAdapter = new SqlDataAdapter();
            dAdapter.SelectCommand = cmd;
            con.Open();
            dAdapter.Fill(objDs);
            con.Close();
            if (objDs.Tables[0].Rows.Count > 0)
            {
                cmbCity.DataSource = objDs.Tables[0];
                cmbCity.DisplayMember = "CityName";
                cmbCity.ValueMember = "CItyID";

            }

        }


VB.NET CODE
Private Sub Form1_Load(sender As Object, e As EventArgs)
 FillCountry()
End Sub
Private Sub FillCountry()
 Dim con As New SqlConnection(strConn)
 Dim cmd As New SqlCommand()
 cmd.Connection = con
 cmd.CommandType = CommandType.Text
 cmd.CommandText = "SELECT CountryID, CountryName FROM Country"
 Dim objDs As New DataSet()
 Dim dAdapter As New SqlDataAdapter()
 dAdapter.SelectCommand = cmd
 con.Open()
 dAdapter.Fill(objDs)
 con.Close()
 cmbCountry.ValueMember = "CountryID"
 cmbCountry.DisplayMember = "CountryName"
 cmbCountry.DataSource = objDs.Tables(0)
End Sub

Private Sub cmbCountry_SelectedIndexChanged(sender As Object, e As EventArgs)
 If cmbCountry.SelectedValue.ToString() <> "" Then
  Dim CountryID As Integer = Convert.ToInt32(cmbCountry.SelectedValue.ToString())
  FillStates(CountryID)
  cmbCity.SelectedIndex = 0
 End If
End Sub

Private Sub FillStates(countryID As Integer)
 Dim con As New SqlConnection(strConn)
 Dim cmd As New SqlCommand()
 cmd.Connection = con
 cmd.CommandType = CommandType.Text
 cmd.CommandText = "SELECT StateID, StateName FROM State WHERE CountryID =@CountryID"
 cmd.Parameters.AddWithValue("@CountryID", countryID)
 Dim objDs As New DataSet()
 Dim dAdapter As New SqlDataAdapter()
 dAdapter.SelectCommand = cmd
 con.Open()
 dAdapter.Fill(objDs)
 con.Close()
 If objDs.Tables(0).Rows.Count > 0 Then
  cmbState.ValueMember = "StateID"
  cmbState.DisplayMember = "StateName"
  cmbState.DataSource = objDs.Tables(0)
 End If

End Sub

Private Sub cmbState_SelectedIndexChanged(sender As Object, e As EventArgs)
 Dim StateID As Integer = Convert.ToInt32(cmbState.SelectedValue.ToString())
 FillCities(StateID)
End Sub

Private Sub FillCities(stateID As Integer)
 Dim con As New SqlConnection(strConn)
 Dim cmd As New SqlCommand()
 cmd.Connection = con
 cmd.CommandType = CommandType.Text
 cmd.CommandText = "SELECT CityID, CityName FROM City WHERE StateID =@StateID"
 cmd.Parameters.AddWithValue("@StateID", stateID)
 Dim objDs As New DataSet()
 Dim dAdapter As New SqlDataAdapter()
 dAdapter.SelectCommand = cmd
 con.Open()
 dAdapter.Fill(objDs)
 con.Close()
 If objDs.Tables(0).Rows.Count > 0 Then
  cmbCity.DataSource = objDs.Tables(0)
  cmbCity.DisplayMember = "CityName"

  cmbCity.ValueMember = "CItyID"
 End If

End Sub


Build and run the application.

ComboBox In Winforms C# VB.NET Cascading Dependent on one another


Download Sample Code


0

PageSetupDialog In C# VB.NET WinForms Windows Forms Application

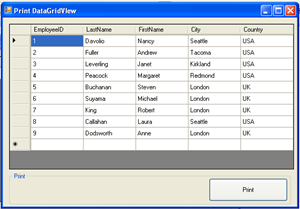
This Example explains how to use PageSetupDialog In Windows Forms Winforms Application With C# And VB.NET to display page setup dialog and Print DataGridView.

PageSetupDialog In C# VB.NET Windows Forms Application

DataGridView is populated with Sql database.

To open PageSetupDialog In windows Forms and create bitmap image of data to print,Generate Click event of button by double clicking on it in design view and write following code.


C# CODE
private void btnPrint_Click(object sender, EventArgs e)
        {
            PrintDocument printDocument1 = new PrintDocument();
            printDocument1.PrintPage += new PrintPageEventHandler(this.printDocument1_PrintPage);
            PageSetupDialog pageSetup = new PageSetupDialog();
            pageSetup.Document = printDocument1;
            pageSetup.PageSettings = printDocument1.DefaultPageSettings;
            
            if (pageSetup.ShowDialog() == DialogResult.OK)
            {
                printDocument1.DefaultPageSettings = pageSetup.PageSettings;
                printDocument1.Print();
            }
         }

        private void printDocument1_PrintPage(object sender, PrintPageEventArgs e)
        {
            Bitmap dataGridViewImage = new Bitmap(this.dataGridView1.Width, this.dataGridView1.Height);
            dataGridView1.DrawToBitmap(dataGridViewImage, new Rectangle(0, 0, this.dataGridView1.Width, this.dataGridView1.Height));
            e.Graphics.DrawImage(dataGridViewImage, 0, 0);
        }

VB.NET CODE
Private Sub btnPrint_Click(sender As Object, e As EventArgs)
 Dim printDocument1 As New PrintDocument()
 printDocument1.PrintPage += New PrintPageEventHandler(AddressOf Me.printDocument1_PrintPage)
 Dim pageSetup As New PageSetupDialog()
 pageSetup.Document = printDocument1
 pageSetup.PageSettings = printDocument1.DefaultPageSettings

 If pageSetup.ShowDialog() = DialogResult.OK Then
  printDocument1.DefaultPageSettings = pageSetup.PageSettings
  printDocument1.Print()
 End If
End Sub

Private Sub printDocument1_PrintPage(sender As Object, e As PrintPageEventArgs)
 Dim dataGridViewImage As New Bitmap(Me.dataGridView1.Width, Me.dataGridView1.Height)
 dataGridView1.DrawToBitmap(dataGridViewImage, New Rectangle(0, 0, Me.dataGridView1.Width, Me.dataGridView1.Height))
 e.Graphics.DrawImage(dataGridViewImage, 0, 0)
End Sub

Build and run the application.

Download Sample Code


0

PrintPreviewDialog In Windows Forms DataGridView C# VB.NET

PrintPreviewDialog Control With DataGridView In Winforms Or Windows Forms Application Using C# And Vb.net

Printpreviewdialog in winforms windows forms datagridview C# vb.Net


In this post i'm explaining how to use printpreviewdialog with C# and vb.net to preview before printing datagridview in windows forms application.

Drag and place one printPreviewDialog control on the page, open it's property window and assign document to be previewed (printdocument1) to it's document property or assign it in code behind.

you can go to link mentioned above to know how to create printdocument.


C# CODE
private void btnPrint_Click(object sender, EventArgs e)
        {
            //Assign printPreviewDialog properties
            pvDialog.Document = printDocument1;
            pvDialog.PrintPreviewControl.Zoom = 1;
            pvDialog.ShowDialog();
        }

        private void printDocument1_PrintPage(object sender, System.Drawing.Printing.PrintPageEventArgs e)
        {
            Bitmap dataGridViewImage = new Bitmap(this.dataGridView1.Width, this.dataGridView1.Height);
            dataGridView1.DrawToBitmap(dataGridViewImage, new Rectangle(0, 0, this.dataGridView1.Width, this.dataGridView1.Height));
            e.Graphics.DrawImage(dataGridViewImage, 0, 0);
        }

VB.NET CODE
Private Sub btnPrint_Click(sender As Object, e As EventArgs)
 pvDialog.Document = printDocument1
 pvDialog.PrintPreviewControl.Zoom = 1
 pvDialog.ShowDialog()
End Sub

Private Sub printDocument1_PrintPage(sender As Object, e As System.Drawing.Printing.PrintPageEventArgs)
 Dim dataGridViewImage As New Bitmap(Me.dataGridView1.Width, Me.dataGridView1.Height)
 dataGridView1.DrawToBitmap(dataGridViewImage, New Rectangle(0, 0, Me.dataGridView1.Width, Me.dataGridView1.Height))
 e.Graphics.DrawImage(dataGridViewImage, 0, 0)
End Sub

Build and run the code

Download Sample Code


0

Print DataGridView In WinForms Windows Forms With C# VB.NET

Printing DataGridView With C# VB.NET In Winforms Windows Froms Application Using PrintDocument class. Drag and place DataGridView on the Windows form and populate it from database or dataset. I have used northwind.

Place one button and name it btnPrint, generate it's click event by double clicking on it We will use this event for printing winform.

Put PrintDocument control from toolbox under printing tab, Double click on it to generate it's PrintPage event.

Print Datagridview in winforms windows application using C# and vb.net

Printing Datagridview in C# vb.NET

Write below mentioned code in respective events.

C# CODE
private void btnPrint_Click(object sender, EventArgs e)
        {
            printDocument1.Print();
        }

        private void printDocument1_PrintPage(object sender, System.Drawing.Printing.PrintPageEventArgs e)
        {
            Bitmap dataGridViewImage = new Bitmap(this.dataGridView1.Width, this.dataGridView1.Height);
            dataGridView1.DrawToBitmap(dataGridViewImage, new Rectangle(0, 0, this.dataGridView1.Width, this.dataGridView1.Height));
            e.Graphics.DrawImage(dataGridViewImage, 0, 0);
        }        }

VB.NET CODE
Private Sub btnPrint_Click(sender As Object, e As EventArgs)
 printDocument1.Print()
End Sub

Private Sub printDocument1_PrintPage(sender As Object, e As System.Drawing.Printing.PrintPageEventArgs)
 Dim dataGridViewImage As New Bitmap(Me.dataGridView1.Width, Me.dataGridView1.Height)
 dataGridView1.DrawToBitmap(dataGridViewImage, New Rectangle(0, 0, Me.dataGridView1.Width, Me.dataGridView1.Height))
 e.Graphics.DrawImage(dataGridViewImage, 0, 0)
End Sub

Build and run the code.

2

VisualStudio Setup Project Updates Version Already Installed Error

Visual Studio Setup Project Updates Another Version Of This Product Is Already Installed Error In Windows Forms or WinForms .

Setup Project Another version already installed error

When we make changes or update in windows forms or winforms application and create setup project to reinstall the application, we get below mentioned error.

Another version of this product is already installed. Installation of this version can not continue.
To configure or remove theexisting version of this product use Add/Remove programs on the control panel.


This error comes because of the same product code and version of application already installed.

To get rid of it we need to configure our setup project as mentioned below.

1. Select and highlight your setup project in solution explorer window.

Highlight setupproject

2. press F4 key to open properties window.

Change version of setup project

3. In this window, RemovePreviousVersions property is set to false by default, change it to TRUE.

4. change last digit of version (something like 1.0.11).

Click yes on next confirmation screen.

Now you need to build setup project again

Right click on setup project name and select BUILD.

now try to install the application over existing one and you won''t get the error.


0

Add Controls Dynamically WinForms WindowsFroms C# VB.NET

In this post i'm explaining how to Add Controls Dynamically In Winforms Windows Forms Application Using C# And VB.NET

I have used northwind database and Employees table to populate combobox and dataGridView.

Place two buttons on the form to add combobox and datagridview on button click and write below mentioned code in click event of each button respectively.

Add Controls Dynamically in Winforms Windows Forms


C#
private void btnDropDown_Click(object sender, EventArgs e)
        {
            int x = 13, y = 70;
            ComboBox cmbDynamic = new ComboBox();
            cmbDynamic.Location = new System.Drawing.Point(x, y);
            cmbDynamic.Name = "cmbDyn";
            cmbDynamic.DisplayMember = "FirstName";
            cmbDynamic.ValueMember = "EmployeeID";
            cmbDynamic.DataSource = employeesBindingSource;
            Controls.Add(cmbDynamic);
            
            
        }

Here X and Y co-ordinates are used to define at which location the control needs to be placed.

private void btnDataGrid_Click(object sender, EventArgs e)
        {
            int x = 13, y = 100;
            DataGridView gvDynamic = new DataGridView();
            gvDynamic.Location = new System.Drawing.Point(x, y);
            gvDynamic.Name = "gvDyn";
            gvDynamic.Width = 250;
            gvDynamic.Height = 260;
            gvDynamic.DataSource = employeesBindingSource;
            Controls.Add(gvDynamic);
        }

VB.NET
Private Sub btnDropDown_Click(sender As Object, e As EventArgs)
 Dim x As Integer = 13, y As Integer = 70
 Dim cmbDynamic As New ComboBox()
 cmbDynamic.Location = New System.Drawing.Point(x, y)
 cmbDynamic.Name = "cmbDyn"
 cmbDynamic.DisplayMember = "FirstName"
 cmbDynamic.ValueMember = "EmployeeID"
 cmbDynamic.DataSource = employeesBindingSource
 Controls.Add(cmbDynamic)


End Sub

Private Sub btnDataGrid_Click(sender As Object, e As EventArgs)
 Dim x As Integer = 13, y As Integer = 100
 Dim gvDynamic As New DataGridView()
 gvDynamic.Location = New System.Drawing.Point(x, y)
 gvDynamic.Name = "gvDyn"
 gvDynamic.Width = 250
 gvDynamic.Height = 260
 gvDynamic.DataSource = employeesBindingSource
 Controls.Add(gvDynamic)
End Sub


Build and run the code.

0

ErrorProvider In WinForms And Windows Forms

ErrorProvider In WinForms or Windows Forms Application Using C# And VB.NET

In this post i am going to describe how to use error provider control in winforms or windows forms application using C# and VB.NET.

ErrorProvider in winforms and windows forms applications
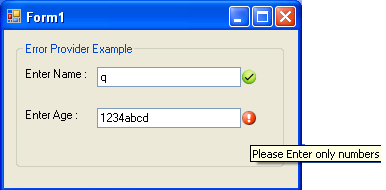
I am using error provider control to display warning or tick icon depending on data entered in textbox so that user can find out text entered is correct or incorrect.

in first textbox i am just checking whether it's empty or not.

Second textbox is numeric only, user can enter only numbers in this and if anything other than number is entered, error provider will show warning icon beside textbox with tooltip containing suggestion.
I have used regular expression to check textbox text for numbers.


For this i have created a simple winform application with 2 textbox on windows forms. follow steps mentioned below for this example.

1. Create new windows application in visual studio.

2. On the form place 2 textbox and 2 errorprovider control from toolbox.

I m using 2 errorproviders, one to display warning icon and other to displat tick or success icon.


Add this namespace in code behind of form to use regex.
using System.Text.RegularExpressions;

now generate Validated or Validating event for both textboxes by opening property windows of textbox and clicking on lightning icon (Events) at the top of window. from there scroll to bottom and double click on validating. it will generate validating event for textbox in code behind.

Write code mentioned below in events generated.

C# code

private void textBox1_Validating(object sender, CancelEventArgs e)  
        {
            if (textBox1.Text == string.Empty)
            {
                errorProvider1.SetError(textBox1, "Please Enter Name");
                errorProvider2.SetError(textBox1, "");
            }
            else
            {
                errorProvider1.SetError(textBox1, "");
                errorProvider2.SetError(textBox1, "correct");
            }
        }

        private void textBox2_Validated(object sender, EventArgs e)
            {
            if (textBox2.Text == string.Empty)
            {
                errorProvider1.SetError(textBox2, "please enter age");
                errorProvider2.SetError(textBox2, "");
            }
            else
            {
                Regex NumericOnly;
                NumericOnly = new Regex(@"^([0-9]*|\d*)$");
                if (NumericOnly.IsMatch(textBox2.Text))
                {
                    errorProvider1.SetError(textBox2, "");
                    errorProvider2.SetError(textBox2, "correct");
                }
                else
                {
                    errorProvider1.SetError(textBox2, "Please Enter only numbers");
                    errorProvider2.SetError(textBox2, "");
                }
            }
        }

VB.NET Code

Private Sub textBox1_Validating(sender As Object, e As CancelEventArgs)
 If textBox1.Text = String.Empty Then
  errorProvider1.SetError(textBox1, "Please Enter Name")
  errorProvider2.SetError(textBox1, "")
 Else
  errorProvider1.SetError(textBox1, "")
  errorProvider2.SetError(textBox1, "correct")
 End If
End Sub

Private Sub textBox2_Validated(sender As Object, e As EventArgs)
 If textBox2.Text = String.Empty Then
  errorProvider1.SetError(textBox2, "please enter age")
  errorProvider2.SetError(textBox2, "")
 Else
  Dim NumericOnly As Regex
  NumericOnly = New Regex("^([0-9]*|\d*)$")
  If NumericOnly.IsMatch(textBox2.Text) Then
   errorProvider1.SetError(textBox2, "")
   errorProvider2.SetError(textBox2, "correct")
  Else
   errorProvider1.SetError(textBox2, "Please Enter only numbers")
   errorProvider2.SetError(textBox2, "")
  End If
 End If
End Sub

Build and run the application.

Download Sample Code


3

Dynamic Buttons Controls Event Handling WinForms Windows Forms

Dynamic Buttons Controls Event Handling In Windows Forms Or Winforms Applications In .Net 2.0,3,5. C# And VB.NET.

Dynamic Buttons in winforms
many times we need to create controls at runtime or through code behind depending on the real time scenario.

In this post i am going to explain how to add dynamic buttons at runtime and handle the Button Click event in winforms or windows forms applications.

I am creating 3 buttons on Form_Load event and placing them on the form.


Write this code in Load event of windows form.


C# Code

private void Form1_Load(object sender, EventArgs e)
        {
            int x = 50, y = 50;
            for (int i = 1; i <= 3; i++)
            {
                Button btnDynamic = new Button();
                btnDynamic.Location = new System.Drawing.Point(x, y);
                btnDynamic.Name = " Dynamic Button " + i;
                btnDynamic.Size = new System.Drawing.Size(100, 50);
                btnDynamic.Text = btnDynamic.Name;
                Controls.Add(btnDynamic);
                x += 100;
                btnDynamic.Click += new EventHandler(this.DynamicButtonClick);
            }
            
        }

Here x and y are horizontal and vertical cordinates where dynamically created buttons will be placed.

x is incremented by 100 each time so that buttons don't get placed overlapped.

when button is created, eventhandler for Click Event of button is associated with it in last line of above mentioned method.

Now write below mentioned method signature in the code behind

private void DynamicButtonClick(object sender, EventArgs e)
   {

   }

Method name must be exactly the same u mentioned in eventhandling code, as It's case sensitive. Write this code inside this method

private void DynamicButtonClick(object sender, EventArgs e)
        {
            Button btnDynamic = (Button)sender;
            btnDynamic.Text = "You Clicked" + btnDynamic.Name;
                      
        }

VB.NET Code

Private Sub Form1_Load(sender As Object, e As EventArgs)
 Dim x As Integer = 50, y As Integer = 50
 For i As Integer = 1 To 3
  Dim btnDynamic As New Button()
  btnDynamic.Location = New System.Drawing.Point(x, y)
  btnDynamic.Name = " Dynamic Button " & i
  btnDynamic.Size = New System.Drawing.Size(100, 50)
  btnDynamic.Text = btnDynamic.Name
  Controls.Add(btnDynamic)
  x += 100
  btnDynamic.Click += New EventHandler(AddressOf Me.DynamicButtonClick)
 Next

End Sub

Private Sub DynamicButtonClick(sender As Object, e As EventArgs)
 Dim btnDynamic As Button = DirectCast(sender, Button)
 btnDynamic.Text = "You Clicked" + btnDynamic.Name

End Sub


Build the application and run.

5

Create Setup And Deployment Project in Visual Studio 2008/2010

Create Setup And Deployment Project In Visual Studio 2008/2010 For Asp.Net Web And Windows Applications

Create setup Project In Visual Studio

In this example i am going to explain how to create setup and deployment project for winforms windows application using visual studio 2005/2008/2010.

Similar approach can be applied for creating setup project for web application as well.


First of all create any sample windows/web application.

Create setup project


Right click on solution explorer root and select Add > New project 


In add new project dialog box select setup and deployment from other project types and then select Setup Project.


In the setup project file system editor window, right click on Application folder > Add > Project Output 


Now select primary output from next dialog box and click on OK.


Right click on User's desktop and create shortcut to primary output in application folder.


Similarly add shortcut in user's program menu.


Build the project by right clicking on setup project name and run the setup.


Hope this helps 


Download the sample code attached 


22

Crystal Reports In Winforms Windows Forms With Parameters

In this example i am explaining how to create Crystal Reports In Winforms Or Windows Forms Application With Parameters from user to filter report using C#.NET and VB.NET

Crystal Reports In Winforms Or Windows Forms Application With Parameters
For this i have created two tables in database named Employees and Projects and fetching data from both tables

I've grouped results by Department name using group expert in crystal reports and put a dropdown on the form to select project name to display related report.

Employee table schema

ID    int  
FirstName    varchar(50)
LastName    varchar(50)   
Department    varchar(50)   
ProjectID    numeric(18, 0)  
Expenses    money   


Projects table schema 

ProjectID    numeric(18, 0)   
ProjectName    varchar(50)  


Create a new project in VS and go to solution explorer and add new item > crystal report.
Select Blank report option from the wizard window
 
Now click on CrystalReports menu and select DataBase Expert 
Now in next window expand Create new connection section and OLEDB(ADO) and in next window select SQL Native Client

Enter you SQL Server name , username and password , select database name from the dropdown and click on ok
In next window expand to find your tables and add them in right pane
Click OK to finish

Now Right Click on Group Name Fields in Field Explorer and Select Group Expert.
In group expert box select the field on which you want data to be grouped.
 
  
Design your report by dragging the fields in section3 (Details) 
my design look like this  
In the form add a combobox and drag and drop CrystalReport Viewer from toobox. click on smart tag and choose the report we created earlier (CrystalReport1.rpt) 
Form look like this 
When we build and rum this report , it asks for Database login username and password , we need to provide database username and password in code behind.
 we need to write code in code behind to filter report based on user selected value or value provided by user 
C# code behind
//Code to populate dropdown
//Fill dropdown in form_Load event by calling 
//function written below
private void FillDropDown()
{
 SqlConnection con = new SqlConnection
       (ConfigurationManager.AppSettings["myConnection"]);
 SqlCommand cmd = new SqlCommand
("Select distinct ProjectID,ProjectName from Projects", con);
 con.Open();
 DataSet objDs = new DataSet();
 SqlDataAdapter dAdapter = new SqlDataAdapter();
 dAdapter.SelectCommand = cmd;
 dAdapter.Fill(objDs);
 cmbMonth.DataSource = objDs.Tables[0];
 cmbMonth.DisplayMember = "ProjectName";
 cmbMonth.ValueMember = "ProjectID";
 cmbMonth.SelectedIndex = 0;
}
private void cmbMonth_SelectedIndexChanged
              (object sender, EventArgs e)
{
      //Create object of report 
CrystalReport1 objReport = new CrystalReport1();

    //set database login information
objReport.SetDatabaseLogon
    ("amit", "password", @"AVDHESH\SQLEXPRESS", "TestDB");

//write formula to pass parameters to report 
crystalReportViewer1.SelectionFormula 
    ="{Projects.ProjectID} =" +cmbMonth.SelectedIndex;
crystalReportViewer1.ReportSource = objReport;
}
      

VB.NET code behind
Private Sub FillDropDown()
    Dim con As New SqlConnection
   (ConfigurationManager.AppSettings("myConnection"))

    Dim cmd As New SqlCommand
("Select distinct ProjectID,ProjectName from Projects", con)
    con.Open()
    Dim objDs As New DataSet()
    Dim dAdapter As New SqlDataAdapter()
    dAdapter.SelectCommand = cmd
    dAdapter.Fill(objDs)
    cmbMonth.DataSource = objDs.Tables(0)
    cmbMonth.DisplayMember = "ProjectName"
    cmbMonth.ValueMember = "ProjectID"
    cmbMonth.SelectedIndex = 0
End Sub

Private Sub cmbMonth_SelectedIndexChanged
(ByVal sender As Object, ByVal e As EventArgs)
    
    'Create object of report 
    Dim objReport As New CrystalReport1()
    
    'set database login information
    objReport.SetDatabaseLogon
("amit", "password", "AVDHESH\SQLEXPRESS", "TestDB")
    
    'write formula to pass parameters to report 
    crystalReportViewer1.SelectionFormula 
= "{Projects.ProjectID} =" & cmbMonth.SelectedIndex

    crystalReportViewer1.ReportSource = objReport
End Sub

Hope this helps

Download sample code


other articles on Crystal reports and winforms
Creating Crystal reports in ASP.NET C# VB.NET

Creating winforms AutoComplete TextBox using C# in Windows application

OpenFileDialog in winforms windows forms C# .NET VB.NET windows application

SubReports in Crystal Reports in ASP.NET

39

AutoComplete TextBox In WinForms Windows Forms Application

In this example i am explaining how to create AutoComplete TextBox In WinForms Windows Forms Application Using C# VB.NET. There are two ways we can use Autocomplete feature

1. Auto complete with previously entered text in textbox.

2. AutoComplete TextBox by fetching data from database.

Read Ajax AutoComplete Extender Textbox for asp.net web applications.

1. Auto complete textBox with previously entered text in textbox.

For filling textbox with previously entered data/text in textbox using Autocomplete feature we can implement by setting autocomplete mode proeprty of textbox to suggest, append or sugestappend and setting autocomplete source to custom source progrmetically

First of all create a global AutoCompleteStringCollection and write code like this

namespace WindowsApplication1
{
public partial class Form1 : Form
{
AutoCompleteStringCollection autoComplete = new AutoCompleteStringCollection();
public Form1()
{
InitializeComponent();
}

private void button1_Click(object sender, EventArgs e)
{
autoComplete.Add(textBox1.Text);
MessageBox.Show("hello");
}

private void Form1_Load(object sender, EventArgs e)
{
textBox1.AutoCompleteMode = AutoCompleteMode.SuggestAppend;
textBox1.AutoCompleteSource = AutoCompleteSource.CustomSource;
//auto.Add(textBox1.Text);
textBox1.AutoCompleteCustomSource = autoComplete;
}
}
}


2. AutoComplete textBox by fetching the data from database.

For this i've created a database with a table containing names which will be shown in textbox as suggestions, for this we need to create a AutoCompleteStringCollection and then add the records in this collection using datareader to fetch records from database

For autocomplete functionalty to work we need to define these 3 properties of textbox

1. AutoCompleteMode - we can choose either suggest or appned or suggestappend as names are self explanatory

2. AutoCompleteSource - this needs to be set as Custom Source

3. AutoCompleteCustomSource - this is the collection we created earlier

The complete C# code will look like this

namespace AutoCompleteTextBox
{

public partial class frmAuto : Form
{
public string strConnection =
ConfigurationManager.AppSettings["ConnString"];
AutoCompleteStringCollection namesCollection =
new AutoCompleteStringCollection();
public frmAuto()
{
InitializeComponent();
}

private void frmAuto_Load(object sender, EventArgs e)
{
SqlDataReader dReader;
SqlConnection conn = new SqlConnection();
conn.ConnectionString = strConnection;
SqlCommand cmd = new SqlCommand();
cmd.Connection = conn;
cmd.CommandType = CommandType.Text;
cmd.CommandText =
"Select distinct [Name] from [Names]" +
" order by [Name] asc";
conn.Open();
dReader = cmd.ExecuteReader();
if (dReader.HasRows == true)
{
while (dReader.Read())
namesCollection.Add(dReader["Name"].ToString());

}
else
{
MessageBox.Show("Data not found");
}
dReader.Close();

txtName.AutoCompleteMode = AutoCompleteMode.Suggest;
txtName.AutoCompleteSource = AutoCompleteSource.CustomSource;
txtName.AutoCompleteCustomSource = namesCollection;

}
private void btnCancel_Click(object sender, EventArgs e)
{
Application.Exit();
}
private void btnOk_Click(object sender, EventArgs e)
{
MessageBox.Show("Hope you like this example");
}

}
}

In the similar way we can also create a autocomplete type combobox

Download Sample Code


10

OpenFileDialog In WinForms Windows Forms Application C# VB.NET

OpenFileDialog In WinForms Windows Forms Application Using C# And VB.NET

In this example i m creating a Open file dialog box to browse and select a file to open in .NET windows applications using C# and winforms


Start a new Windows Application project and drag a button, double click on the button to generate it's click event

Now create a new openFileDialog

OpenFileDialog fDialog = new OpenFileDialog();

To set the title of window
fDialog.Title = "Open Image Files";

To apply filter, which only allows the files with the name or extension specified to be selected. in this example i m only using jpeg and GIF files
fDialog.Filter = "JPEG Files|*.jpeg|GIF Files|*.gif";

To set the Initial Directory property ,means which directory to show when the open file dialog windows opens
fDialog.InitialDirectory = @"C:\";

if the user has clicked the OK button after choosing a file,To display a MessageBox with the path of the file:
if(fDialog.ShowDialog() == DialogResult.OK)
{
MessageBox.Show(fDialog.FileName.ToString());
}


If you want to select multiple files ,set the Multiselect property to true and to return the name of the files use fDialog.FileNames instead of fDialog.FileName. This will return a string array with the name of the files.
Other properties which we can use are :
If a user types the name of a file but doesn't specify the extension you can set the AddExtension property to true:
fDialog.AddExtension = true;

if a user types the name of a file or path that does not exist we can give him an warning:
fDialog.CheckFileExists = true;
fDialog.CheckPathExists = true;


Find More Articles